No Products in the Cart
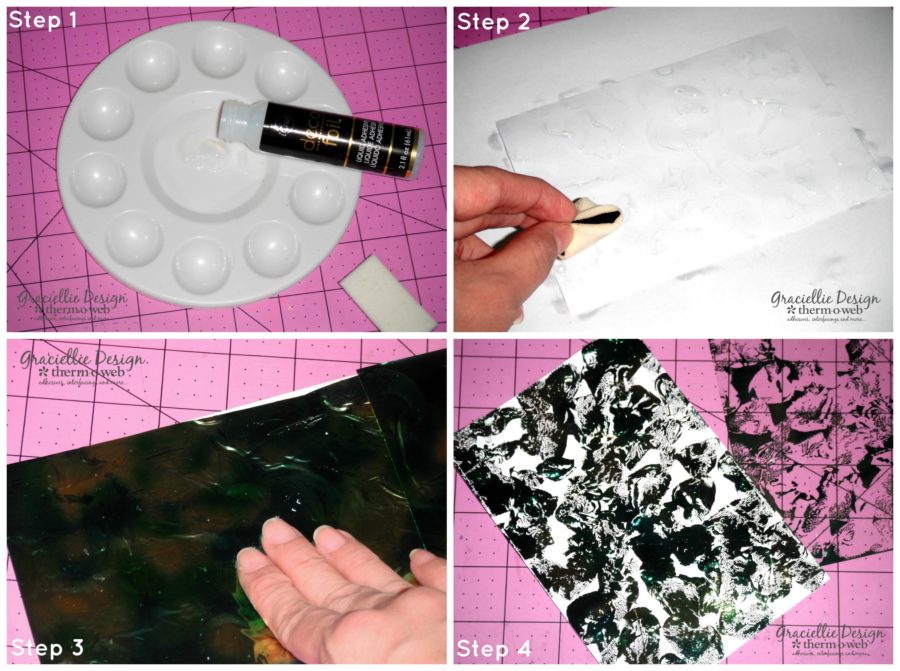 Step 3
Apply your choice of watercolor Deco Foil Transfer Sheet to the cardstock, pressing and burnishing it onto every area.
Step 4
Peel off the transfer sheet liner to reveal your Deco Foil background.
Step 5
Cut a piece of white cardstock and a piece of Deco Foil Hot Melt Adhesive both in the same size.
Step 6
Place the piece of hot melt adhesive on top of the cardstock (rough side facing down) and run through your laminator using parchment paper.
Step 3
Apply your choice of watercolor Deco Foil Transfer Sheet to the cardstock, pressing and burnishing it onto every area.
Step 4
Peel off the transfer sheet liner to reveal your Deco Foil background.
Step 5
Cut a piece of white cardstock and a piece of Deco Foil Hot Melt Adhesive both in the same size.
Step 6
Place the piece of hot melt adhesive on top of the cardstock (rough side facing down) and run through your laminator using parchment paper.
 Step 7
Peel of the hot melt adhesive liner from the white cardstock.
Step 8
Cut a piece of Deco Foil Transfer Sheet (in a solid color that matches your watercolor Deco Foil background), place it on top of the cardstock (covering the side with adhesive) and run again through your laminator using parchment paper.
Step 7
Peel of the hot melt adhesive liner from the white cardstock.
Step 8
Cut a piece of Deco Foil Transfer Sheet (in a solid color that matches your watercolor Deco Foil background), place it on top of the cardstock (covering the side with adhesive) and run again through your laminator using parchment paper.
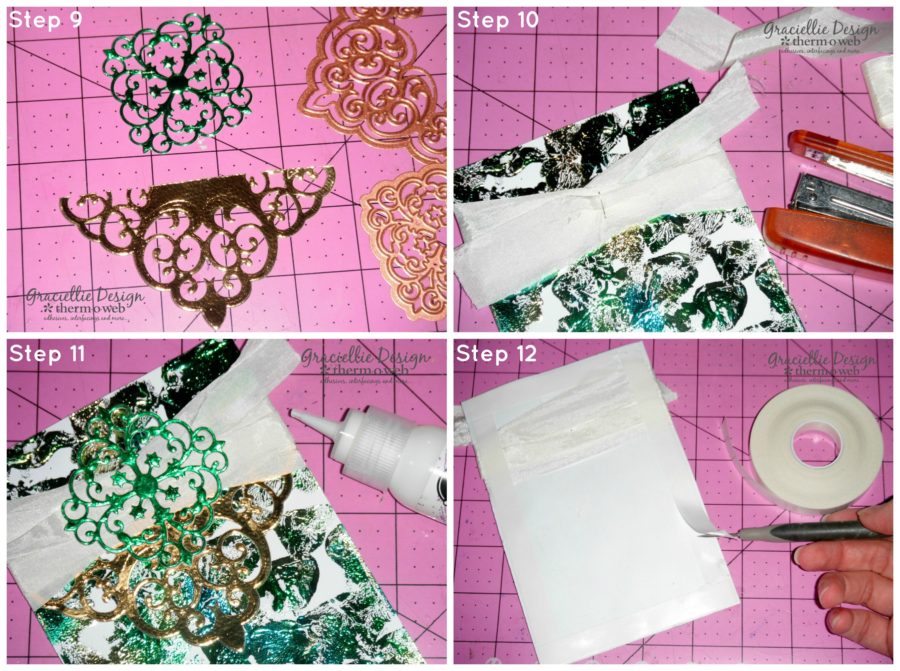 Step 9
Die cut a small medallion from the previously foiled cardstock. Repeat steps 5 through 8 to foil a second piece of cardstock in gold and die cut a larger medallion from it (to be cut in half).
- Optional Step -
Die cut several small medallions from white cardstock and glue them onto each other using iCraft Mixed Media Adhesive to create a custom chipboard piece (attaching the foiled medallion on top).
Step 10
Wrap a piece of crinkle ribbon around the top of the Deco Foil background and secure using a staple.
Step 11
Embellish the background adhering the small medallion on top of the ribbon and the cut large medallion underneath it, using iCraft Mixed Media Adhesive.
Step 12
Add Easy Tear iCraft Adhesive™ Tape to the back of the foiled piece and adhere to a white card base.
Step 13
Finish your card off by attaching a gold button to the medallion. I used mixed media adhesive for that too!
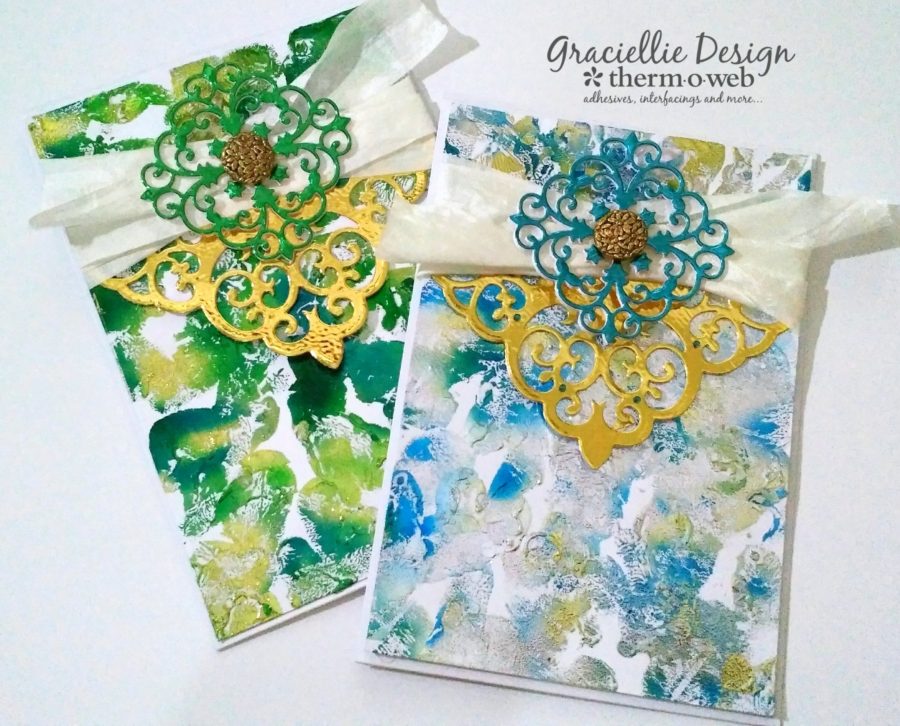
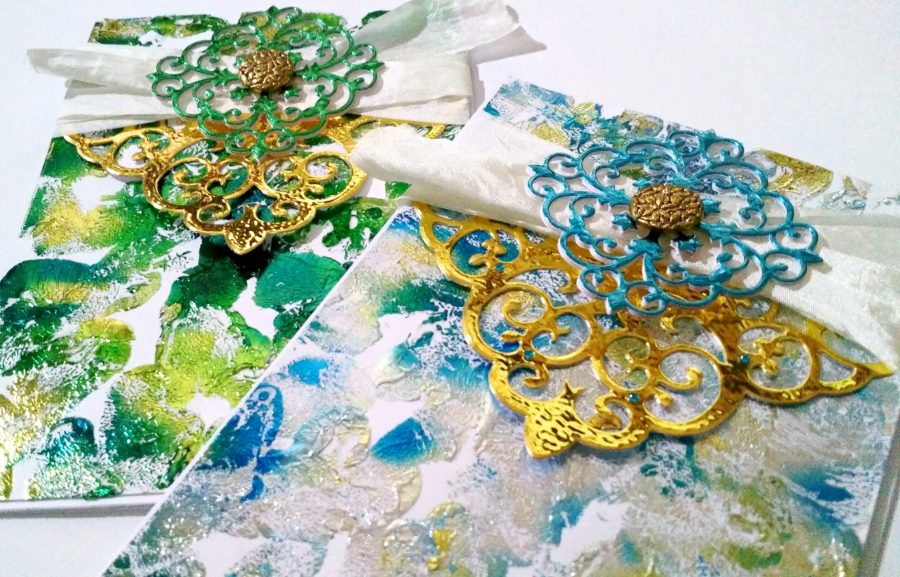
This technique will give you unique results every time. These beautiful Deco Foil textured backgrounds are great for not only cards but also tags, canvases and more... You get an amazing effect with all the new watercolor Deco Foil transfer sheets but you could also layer two or more different colors of Deco Foil repeating step 2 through 5 as many times as needed. Be sure to give it a try!
Step 9
Die cut a small medallion from the previously foiled cardstock. Repeat steps 5 through 8 to foil a second piece of cardstock in gold and die cut a larger medallion from it (to be cut in half).
- Optional Step -
Die cut several small medallions from white cardstock and glue them onto each other using iCraft Mixed Media Adhesive to create a custom chipboard piece (attaching the foiled medallion on top).
Step 10
Wrap a piece of crinkle ribbon around the top of the Deco Foil background and secure using a staple.
Step 11
Embellish the background adhering the small medallion on top of the ribbon and the cut large medallion underneath it, using iCraft Mixed Media Adhesive.
Step 12
Add Easy Tear iCraft Adhesive™ Tape to the back of the foiled piece and adhere to a white card base.
Step 13
Finish your card off by attaching a gold button to the medallion. I used mixed media adhesive for that too!
This technique will give you unique results every time. These beautiful Deco Foil textured backgrounds are great for not only cards but also tags, canvases and more... You get an amazing effect with all the new watercolor Deco Foil transfer sheets but you could also layer two or more different colors of Deco Foil repeating step 2 through 5 as many times as needed. Be sure to give it a try!