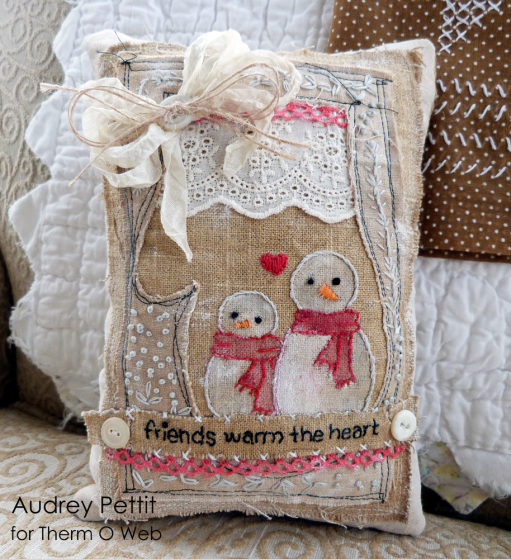


Friends Warm the Heart Pillow
By Audrey Pettit
Supplies:
SpraynBond® Fusible Adhesive
PeelnStick Fabric Fuse™ Tape
Zots™ Medium Clear Adhesive Dots
Stamps: Lawn Fawn
Die: Papertrey Ink
Trim: Webster’s Pages, Stampin’Up, American Crafts
Floss: DMC
Ink: Stampin’Up
Buttons: vintage
Other: Linen Fabric, Gesso, Thread, Polyfill Fiber
I had so much fun putting this pillow together, and thanks to the help of some time-saving tips from Therm O Web’s Spray n’ Bond Adhesives, it was really easy, too.

Diecut the Mitten from Linen Fabric
To get started, die-cut a mitten from linen fabric. Set the mitten aside for another project, because for this pillow, we are going to be focusing on the negative shape instead. Here is a
pattern, if you do not have a mitten die.
Spray the Backside with SpraynBond
Spray the backside of the fabric with Therm O Web SpraynBond® Fusible Adhesive and layer onto a larger piece of fabric. The Fusible Adhesive eliminates the need to pin the fabric in place, which is a real time saver.
Machine stitch around the outline of the mitten, and around the edge of the fabric using black thread.

Embroider Embellishments
Add random embroidery stitches around the outline of the mitten. Mix it up and just have fun!
Stamp snowmen, scarf, and heart images onto the center of the mitten. Using the stamped images as a guide, embroider the outlines of the snowmen and scarves. Satin stitch the heart. If you don't have this snowmen stamp set, use whatever images you may have on hand, or feel free to use this
pattern.
Watercolor the scarves using a red ink pad and a wet paintbrush. Then paint the snowmen with Gesso. Dry brush more Gesso randomly over the entire piece.

Stamp a Sentiment
Stamp or write a sentiment onto a thin strip of fabric and hand-stitch with black floss. Apply Fabric Fuse™ Tape to the back of the strip, peel off the liner, and adhere across the bottom.

Lightly lift sentiment strip and tuck lace trim under the bottom edge. Add a few hand-stitches for decoration. Using Fabric Fuse™ Tape, adhere trims across the top of the mitten.
Spray the back of the fabric with SpraynBond® Fusible Adhesive and adhere onto a larger piece of fabric. Machine stitch the edges. Dry brush with additional Gesso.

Cut a second piece of fabric the same size as the layered front. Placing right sides together, machine stitch the pillow closed, leaving a small opening. Turn the pillow right side out, fill with polyfill fiber and slip stitch the pillow closed.
Adhere buttons with Zots™ Medium Clear Adhesive Dots. Tie a bow from shabby seam binding. Adhere onto the pillow using Zots™, along with another button tied with hemp cord.
Don't forget...you can shop for all the Therm O Web and HeatnBond® products used today right from
our NEW website! It's safe, secure, and fast too!