No Products in the Cart
 Therm O Web Supplies Used:
Deco Foil Flock Transfer Sheets – Ruby Red
Deco Foil Flock Transfer Sheets – Emerald Green
Deco Foil Flock Transfer Sheets – White Latte
Deco Foil Transfer Sheets - Silver Stars
Deco Foil Transfer Sheets - Red
Deco Foil™ PeelnStick Toner Sheets
iCraft Adhesive™ Tape • 1/4 in
Memory Tape Runner XL™
iCraft Ultra Bond Adhesive 2 fl oz
Gina K. Designs Premium Cardstock • Luxury White
Gina K. Designs (3) Nested Rectangle Dies • Single Stitch Design • Large Set
Gina K. Designs Sheer Satin Fancy Ribbon 5/8" x 10 yd - White & Gold
Gina K. Designs Foam Squares White (320 squares)
Other supplies used:
Sizzix - Tree Line die; Retro Merry Christmas die; Bird Branch Bigz die; Holly Ribbon Texture Fades embossing folder
We R Memory Keepers - Polka Dot embossing folders; Triangle embossing folders
Stampers Anonymous - Modern Christmas stamps; Great Outdoors stamps; Watercolor Trees stamps
Echo Park Paper Company - Carta Bella Christmas Market Collection Kit
Miscellaneous - kraft cardstock; red and white butcher's twine; gold embossing powder; silver, red and gold glitter glue (optional) ; circle punches; foil laminator; die cutting machine; paper trimmer; heat gun; scissors; button thread
Therm O Web Supplies Used:
Deco Foil Flock Transfer Sheets – Ruby Red
Deco Foil Flock Transfer Sheets – Emerald Green
Deco Foil Flock Transfer Sheets – White Latte
Deco Foil Transfer Sheets - Silver Stars
Deco Foil Transfer Sheets - Red
Deco Foil™ PeelnStick Toner Sheets
iCraft Adhesive™ Tape • 1/4 in
Memory Tape Runner XL™
iCraft Ultra Bond Adhesive 2 fl oz
Gina K. Designs Premium Cardstock • Luxury White
Gina K. Designs (3) Nested Rectangle Dies • Single Stitch Design • Large Set
Gina K. Designs Sheer Satin Fancy Ribbon 5/8" x 10 yd - White & Gold
Gina K. Designs Foam Squares White (320 squares)
Other supplies used:
Sizzix - Tree Line die; Retro Merry Christmas die; Bird Branch Bigz die; Holly Ribbon Texture Fades embossing folder
We R Memory Keepers - Polka Dot embossing folders; Triangle embossing folders
Stampers Anonymous - Modern Christmas stamps; Great Outdoors stamps; Watercolor Trees stamps
Echo Park Paper Company - Carta Bella Christmas Market Collection Kit
Miscellaneous - kraft cardstock; red and white butcher's twine; gold embossing powder; silver, red and gold glitter glue (optional) ; circle punches; foil laminator; die cutting machine; paper trimmer; heat gun; scissors; button thread
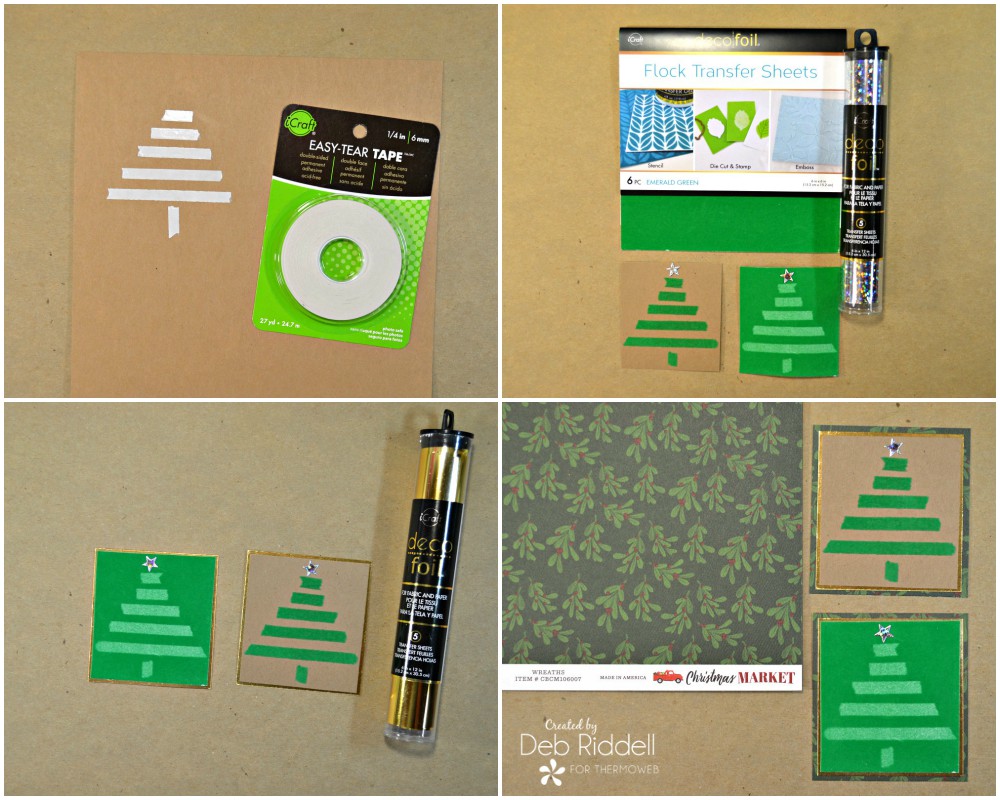 Foil another piece of Deco Foil PeelnStick Toner Sheet with Gold Deco Foil. Apply your flocked trees to the foiled toner sheet with your Memory XL Tape Runner, leaving about a 1/8" reveal on all sides. Back these layers with a piece of Christmas themed scrapbook paper (this is Carta Bella's Christmas Market #CBCM106007), again with about a 1/8" to 1/4" reveal on all sides.
Stamp a sentiment of your choice onto kraft cardstock, cut it to size and back it with more of the same Christmas themed scrapbook paper.
Foil another piece of Deco Foil PeelnStick Toner Sheet with Gold Deco Foil. Apply your flocked trees to the foiled toner sheet with your Memory XL Tape Runner, leaving about a 1/8" reveal on all sides. Back these layers with a piece of Christmas themed scrapbook paper (this is Carta Bella's Christmas Market #CBCM106007), again with about a 1/8" to 1/4" reveal on all sides.
Stamp a sentiment of your choice onto kraft cardstock, cut it to size and back it with more of the same Christmas themed scrapbook paper.
 Make a couple of card blanks from kraft cardstock (the size will depend upon the size of your trees) and apply the layered flocked Christmas trees and the sentiments to the front with your Memory XL Tape runner. Quick and easy tape transfer flocked cards done!
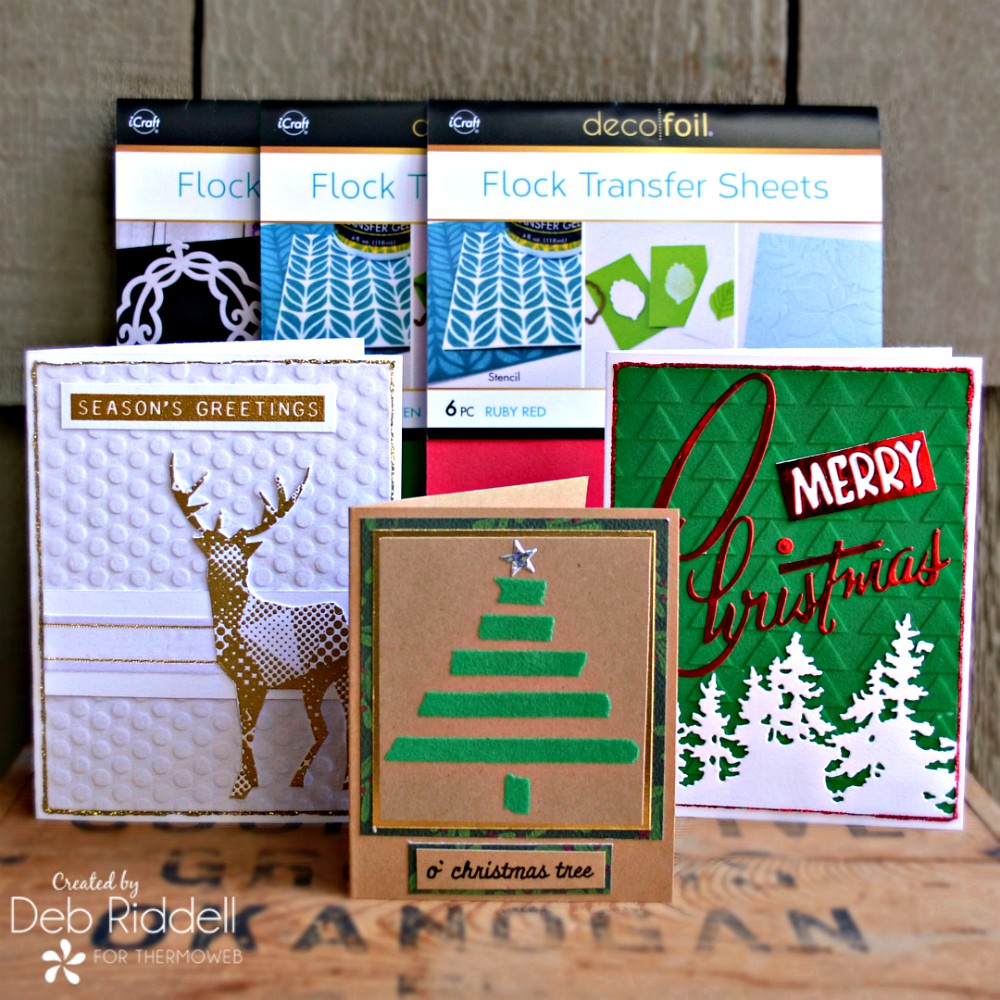
Embossed Flock Christmas Cards
Deco Foil Flock Transfer Sheets emboss beautifully and make wonderful textured backgrounds for your Christmas cards. By adding a couple of die cuts or stamped images you can have a lovely flocked Christmas card in no time at all.
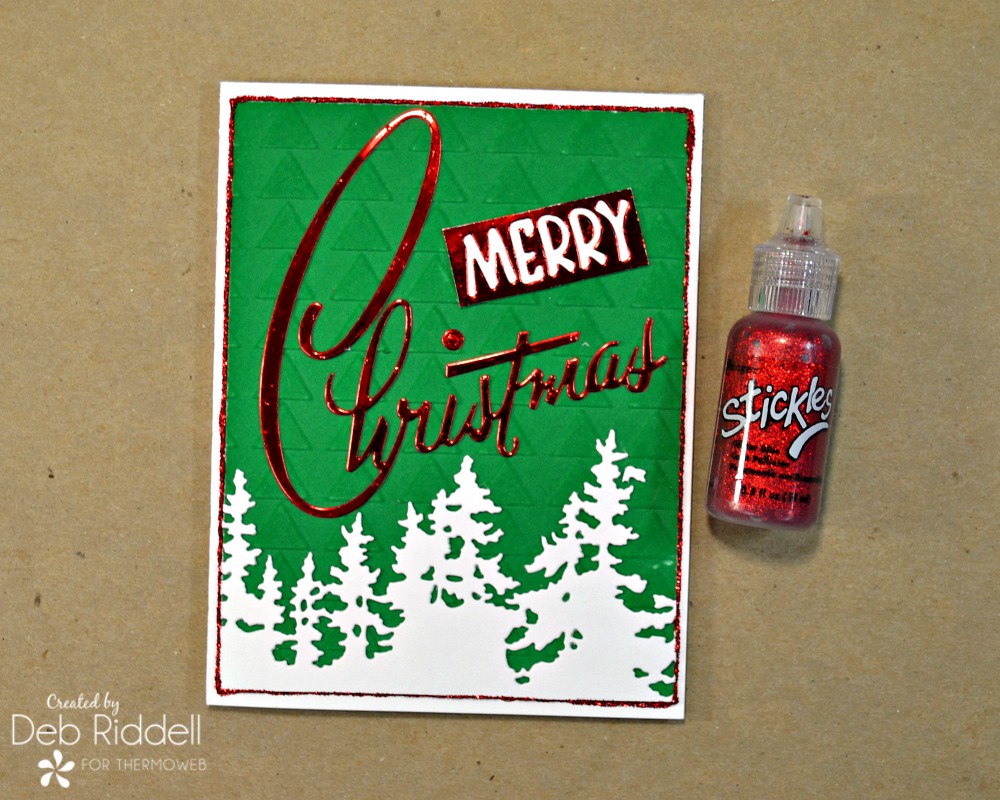
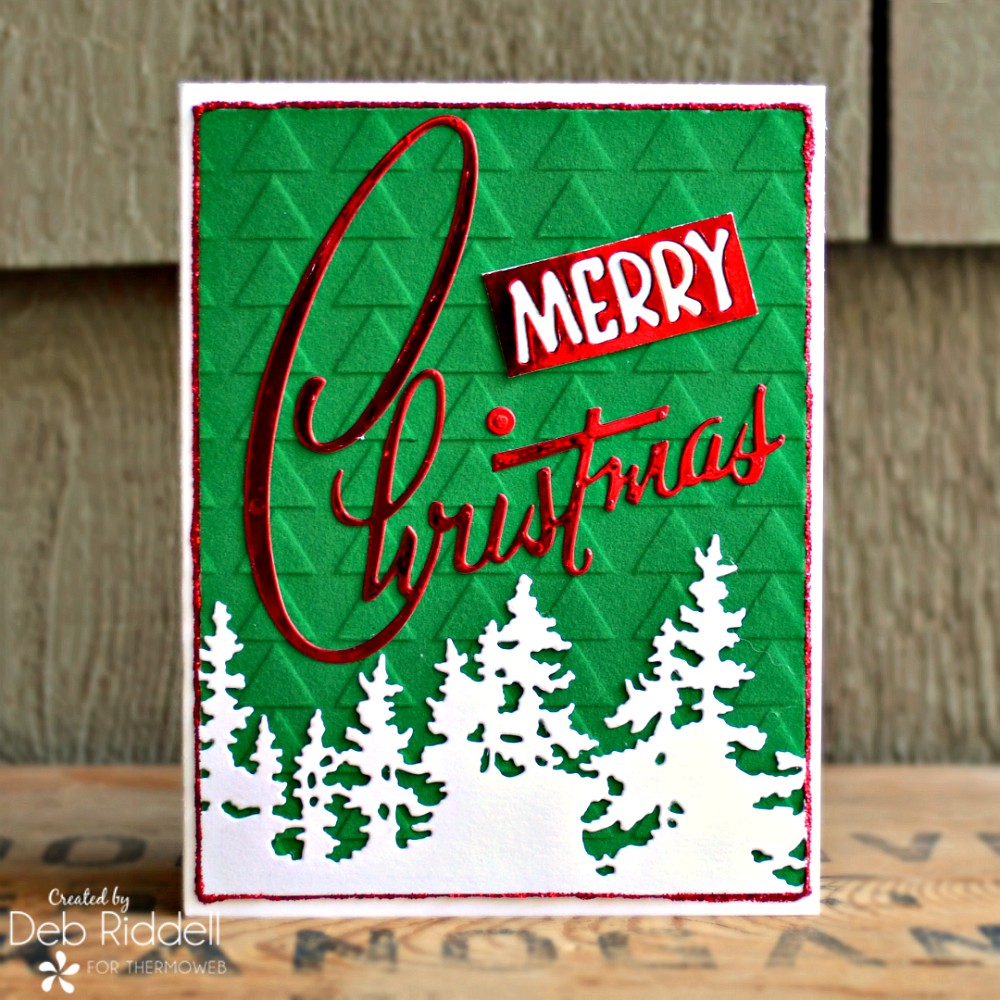
For this Merry Christmas flocked card, emboss a piece of Emerald Green Flock Transfer Sheet with a triangle embossing folder (the design reminded me of trees!). We are going to make an A2 sized card (4 1/4" x 5 1/2") so trim the embossed flock transfer sheet to 4" x 5 1/4" (remember to cut it from the backside if using your paper trimmer). Foil a piece of Deco Foil PeelnStick Toner Sheet with Red Deco Foil and die cut the Merry Christmas sentiment. Die cut the Tree Line die from white cardstock.
Make a couple of card blanks from kraft cardstock (the size will depend upon the size of your trees) and apply the layered flocked Christmas trees and the sentiments to the front with your Memory XL Tape runner. Quick and easy tape transfer flocked cards done!
Embossed Flock Christmas Cards
Deco Foil Flock Transfer Sheets emboss beautifully and make wonderful textured backgrounds for your Christmas cards. By adding a couple of die cuts or stamped images you can have a lovely flocked Christmas card in no time at all.
For this Merry Christmas flocked card, emboss a piece of Emerald Green Flock Transfer Sheet with a triangle embossing folder (the design reminded me of trees!). We are going to make an A2 sized card (4 1/4" x 5 1/2") so trim the embossed flock transfer sheet to 4" x 5 1/4" (remember to cut it from the backside if using your paper trimmer). Foil a piece of Deco Foil PeelnStick Toner Sheet with Red Deco Foil and die cut the Merry Christmas sentiment. Die cut the Tree Line die from white cardstock.
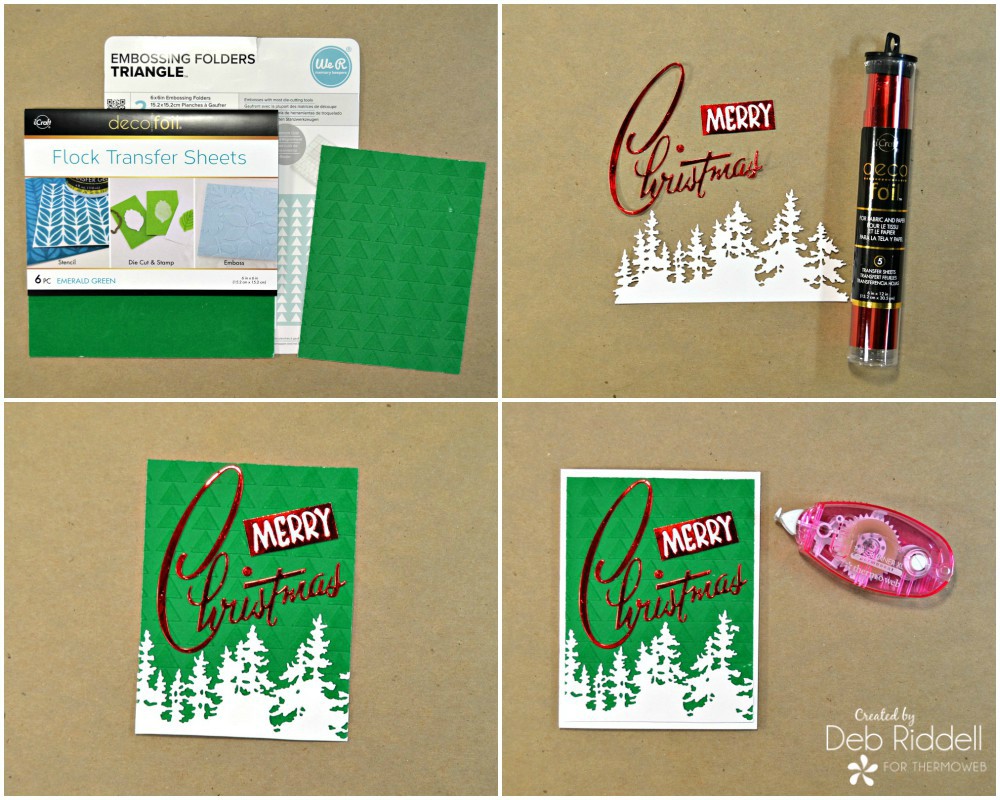 Adhere the Merry Christmas sentiment to the upper part of the card. Adhere the Tree Line die cut along the bottom of the card with Ultra Bond Liquid Adhesive, trimming off the sides and bottom of the die cut as necessary to make it fit. Make an A2 sized card blank from Gina K. Designs Luxury White cardstock and adhere the flocked card assembly to it with your Memory XL tape runner. You can certainly send this card as is but if you have the time to let it dry, add a line of red glitter glue around the outer edges to finish it off.
 And here's a second embossed flocked card idea for you created with stamped images. Emboss a piece of White Latte Deco Foil Flock Transfer Sheet with a polka dot or swiss dot embossing folder (snowflakes!) and trim it to 4" x 5 1/4". Stamp the stag from the Modern Christmas stamp set along with the Season's Greetings sentiment onto white cardstock and emboss it with gold embossing powder. Fussy cut the deer and cut the sentiment to size. Get our your Gina K. Designs White/Gold Sheer Satin Fancy ribbon.
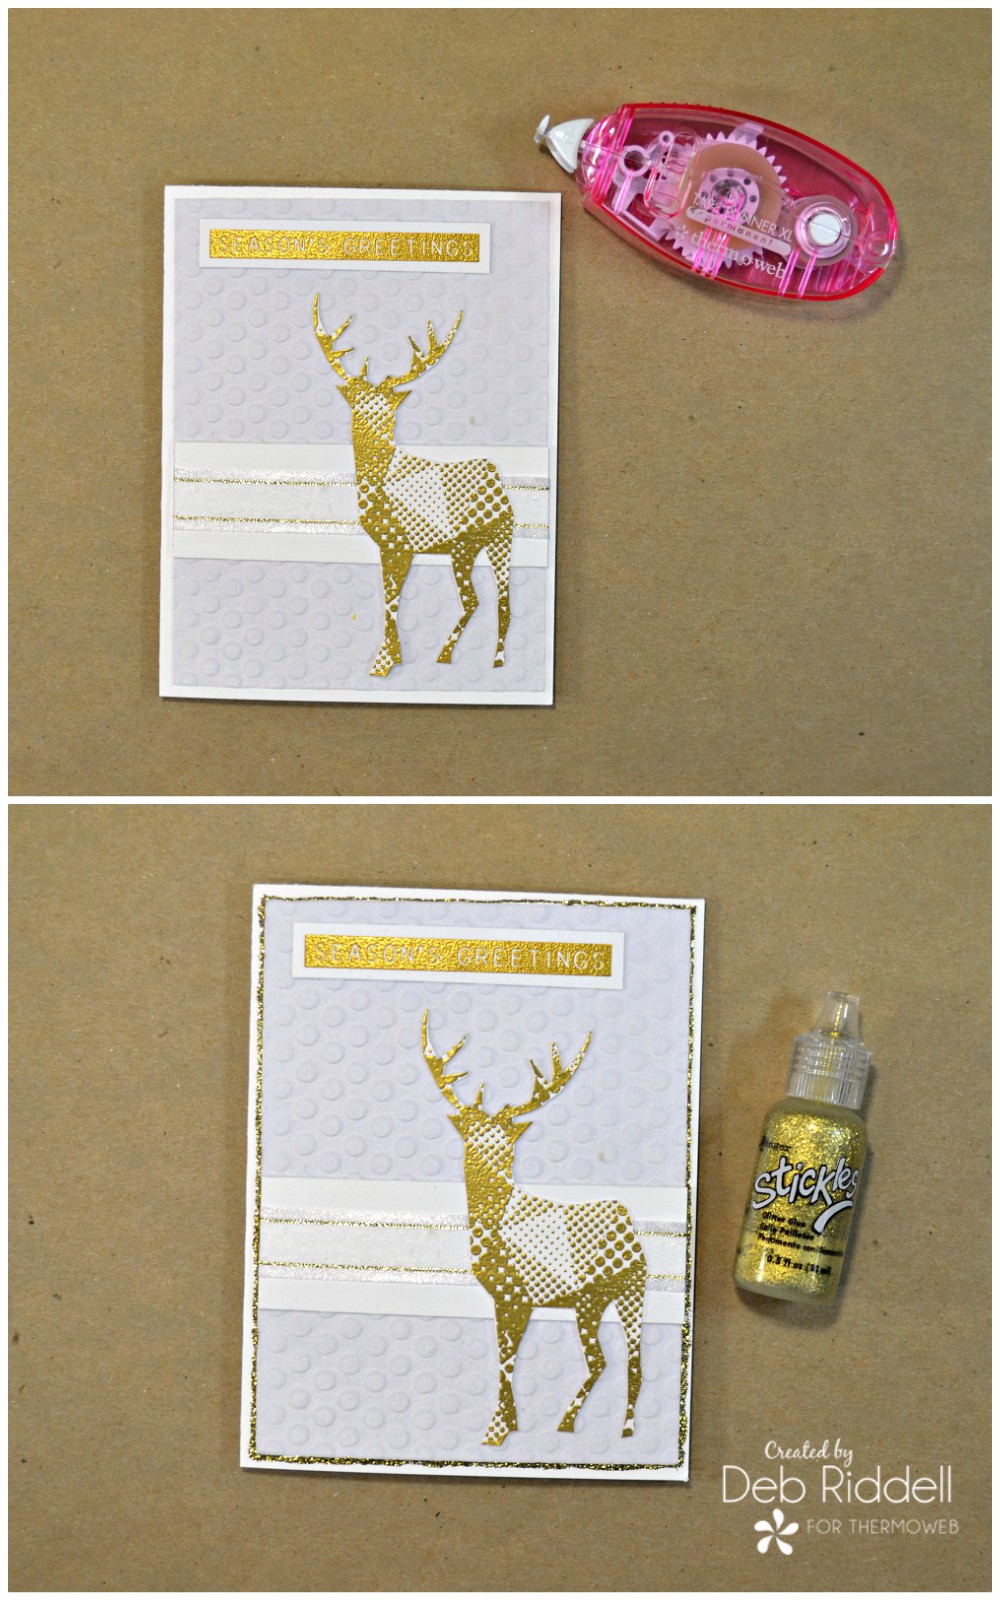
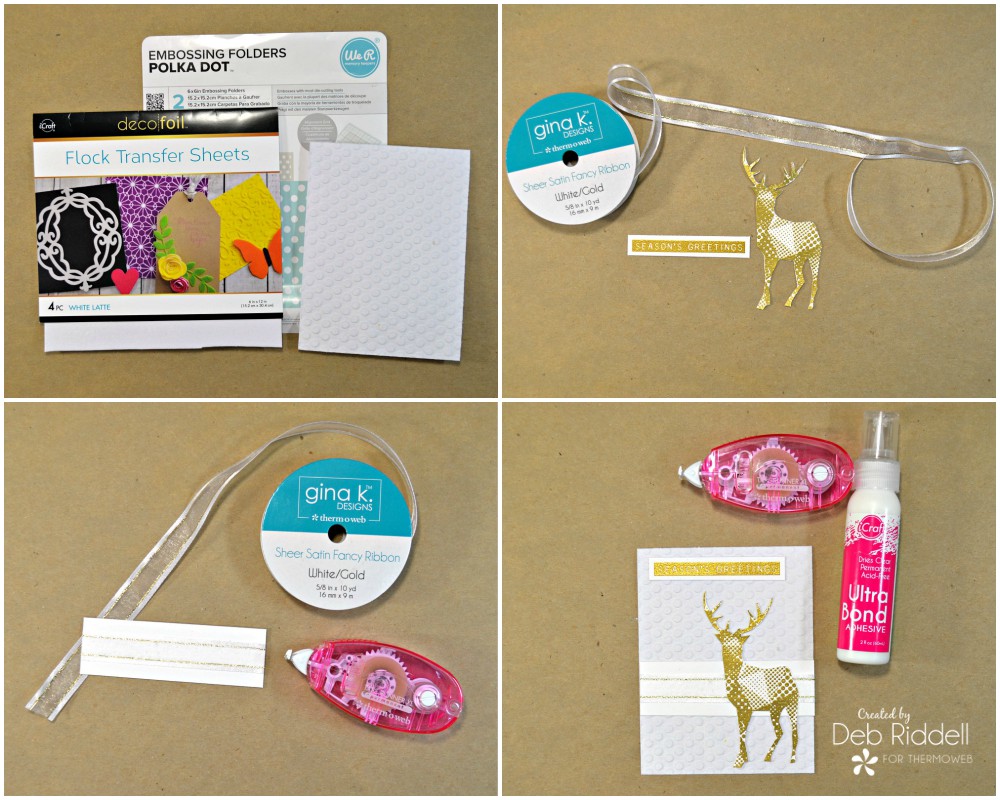 Cut a piece of white cardstock 1 1/2" x 4" and adhere the ribbon down the middle with your Memory XL tape runner. Adhere the ribbon wrapped cardstock to the embossed flock background with your tape runner and adhere the stamped deer on top with Ultra Bond Liquid adhesive. Adhere the sentiment to the top of the flocked panel with your tape runner.
Make another A2 card blank from Gina K. Designs Luxury White cardstock and adhere the flocked panel to it with your Memory XL tape runner. You can certainly send this elegant white and gold card as is but if you have the time to let it dry add some gold glitter glue around the outside for a bit more bling.
Cut a piece of white cardstock 1 1/2" x 4" and adhere the ribbon down the middle with your Memory XL tape runner. Adhere the ribbon wrapped cardstock to the embossed flock background with your tape runner and adhere the stamped deer on top with Ultra Bond Liquid adhesive. Adhere the sentiment to the top of the flocked panel with your tape runner.
Make another A2 card blank from Gina K. Designs Luxury White cardstock and adhere the flocked panel to it with your Memory XL tape runner. You can certainly send this elegant white and gold card as is but if you have the time to let it dry add some gold glitter glue around the outside for a bit more bling.
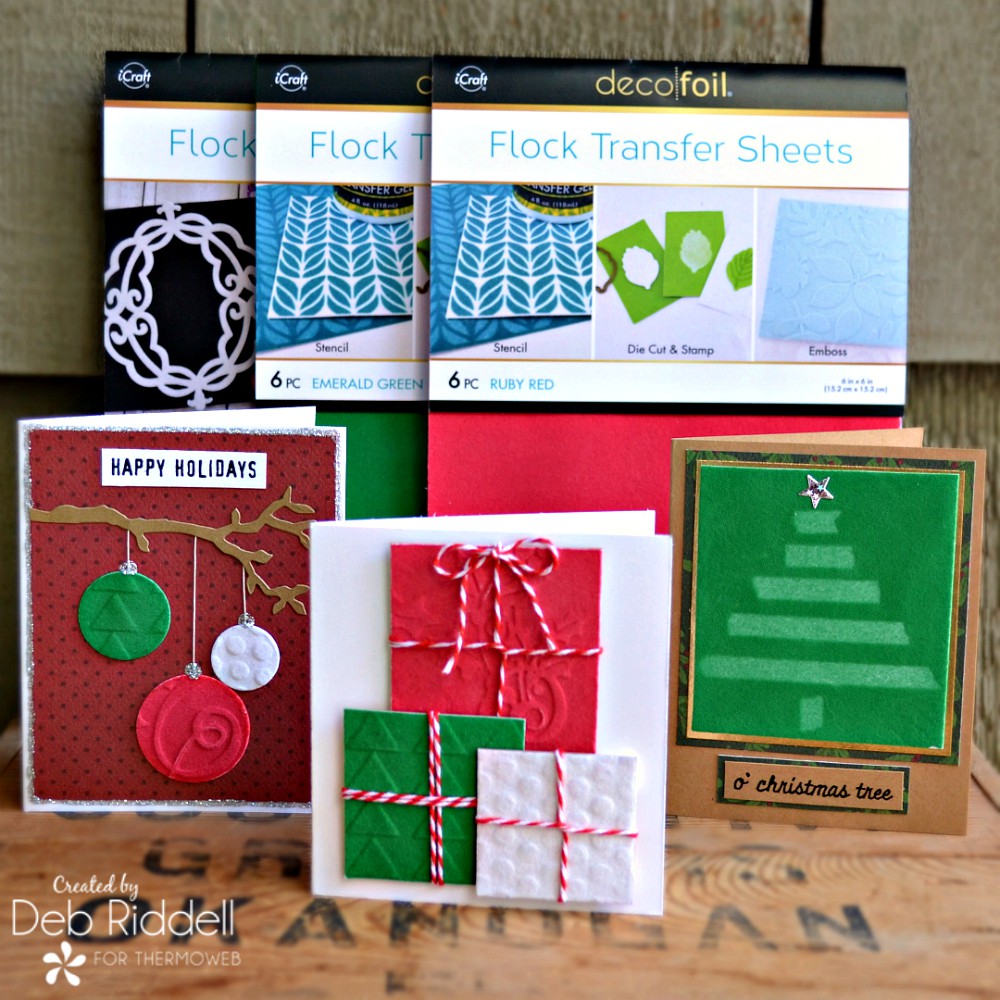
 Flocked Presents and Ornaments Cards
Being a frugal sort, I'm always looking for ways to use my leftover bits and bobs so I came up with a couple more quick cards using the leftover pieces of White Latte and Emerald Green embossed flock transfer sheets. I decided that I needed a bit more color so I also embossed a piece of Ruby Red Flock Transfer Sheet with a Holly Ribbon embossing folder.
Flocked Presents and Ornaments Cards
Being a frugal sort, I'm always looking for ways to use my leftover bits and bobs so I came up with a couple more quick cards using the leftover pieces of White Latte and Emerald Green embossed flock transfer sheets. I decided that I needed a bit more color so I also embossed a piece of Ruby Red Flock Transfer Sheet with a Holly Ribbon embossing folder.
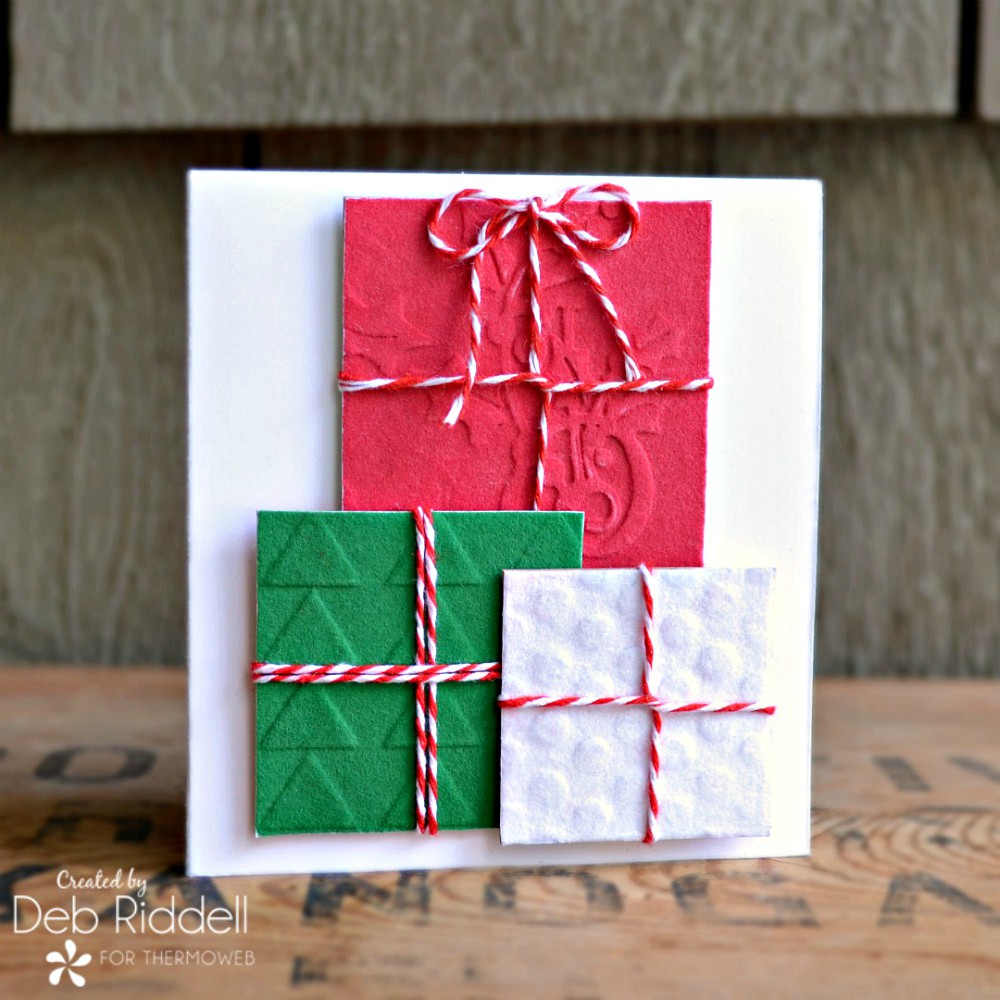
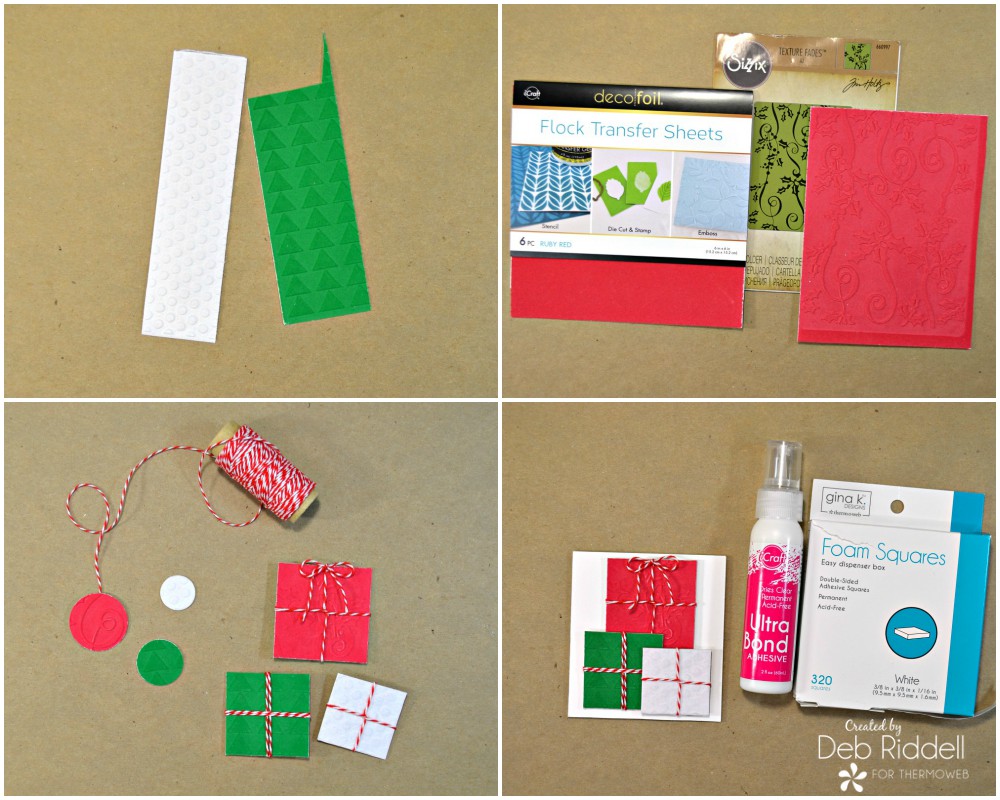 Cut some little square presents and punch out some circles for ornaments from the embossed flock sheets. Set the circular ornaments aside for the moment and wrap each present with red and white butcher's twine. Make a card blank from Gina K. Designs Luxury White cardstock (the size of your card will depend upon the size that you made your presents) and adhere the presents to the front of the card, popping them up on some white foam squares. Embossed presents card done, how easy was that!
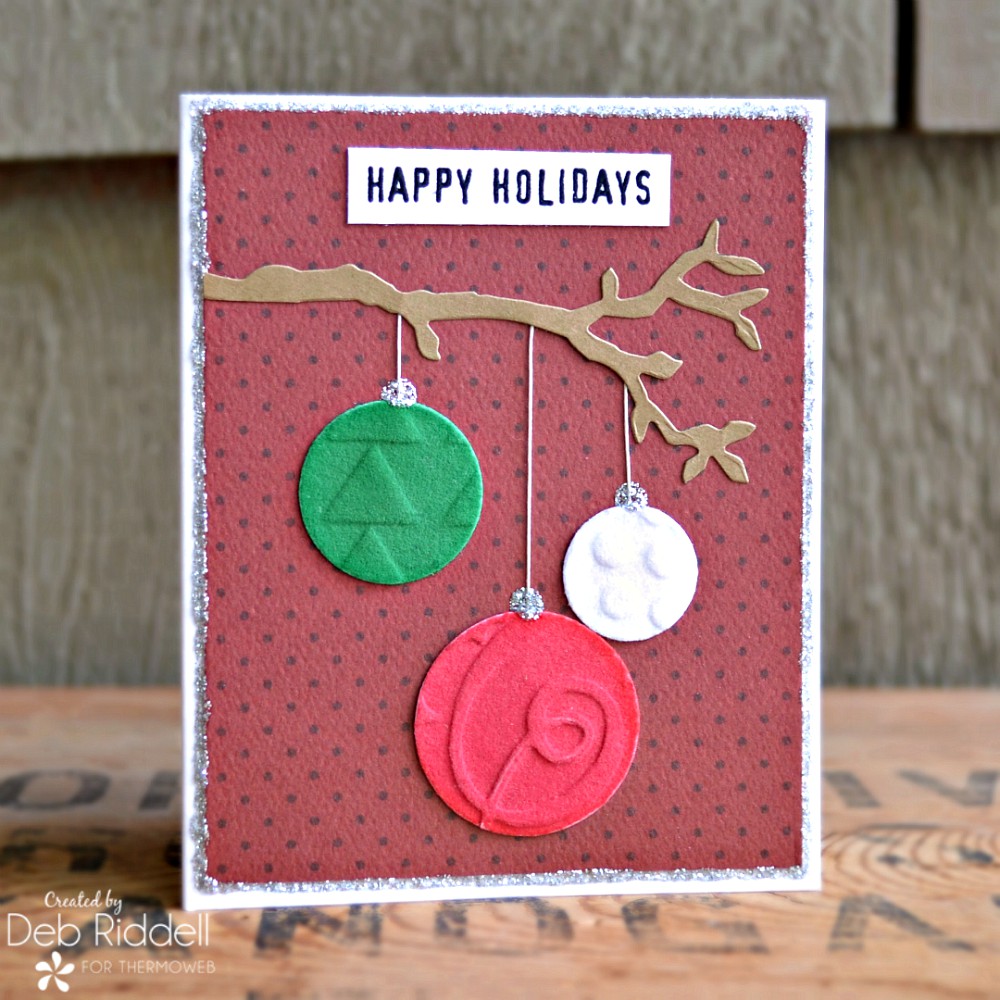
And finally, for the Christmas ornaments card, die cut a branch from kraft cardstock and attached the ornaments to it with pieces of button thread. Adhere the ornament assembly to a piece of Christmas themed scrapbook paper (Carta Bella Christmas Market #CBCM106102) along with a stamped sentiment. The size of your card front will depend upon what sizes your punched flocked ornaments are, mine were 1 1/4", 1" and 3/4".
Cut some little square presents and punch out some circles for ornaments from the embossed flock sheets. Set the circular ornaments aside for the moment and wrap each present with red and white butcher's twine. Make a card blank from Gina K. Designs Luxury White cardstock (the size of your card will depend upon the size that you made your presents) and adhere the presents to the front of the card, popping them up on some white foam squares. Embossed presents card done, how easy was that!
And finally, for the Christmas ornaments card, die cut a branch from kraft cardstock and attached the ornaments to it with pieces of button thread. Adhere the ornament assembly to a piece of Christmas themed scrapbook paper (Carta Bella Christmas Market #CBCM106102) along with a stamped sentiment. The size of your card front will depend upon what sizes your punched flocked ornaments are, mine were 1 1/4", 1" and 3/4".
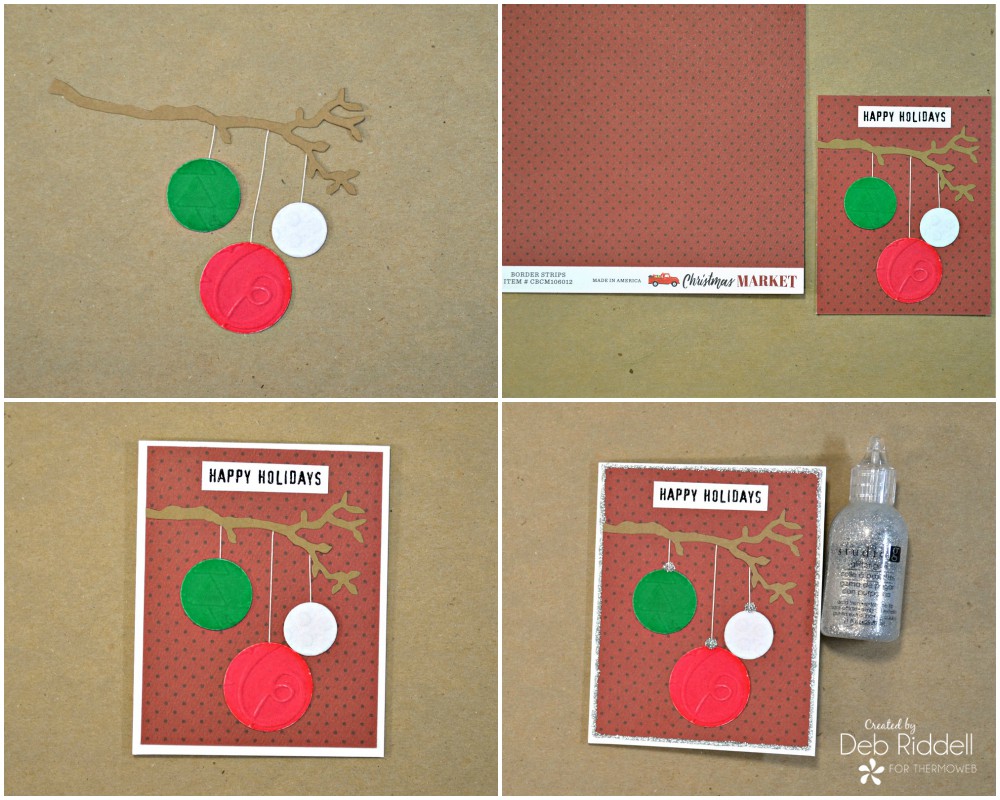 Make a card blank from Gina K. Designs Luxury White cardstock and adhere the flocked ornaments assembly to it with your Memory XL tape runner. Again, if you have time to let it dry, add a line of silver glitter glue around the outside edges and also add a wee dot to the top of each ornament. Your quick and easy flocked Christmas cards are done!
Here are a few closeups of the finished cards.
Make a card blank from Gina K. Designs Luxury White cardstock and adhere the flocked ornaments assembly to it with your Memory XL tape runner. Again, if you have time to let it dry, add a line of silver glitter glue around the outside edges and also add a wee dot to the top of each ornament. Your quick and easy flocked Christmas cards are done!
Here are a few closeups of the finished cards.


 I hope that you've enjoyed seeing how they all came together and that you now have some ideas for your own handmade cards. Even though time is short until the big day, Deco Foil Flock Transfer Sheets make it quick and easy! Thanks as always for stopping by today and happy creating,
Deb xo
I hope that you've enjoyed seeing how they all came together and that you now have some ideas for your own handmade cards. Even though time is short until the big day, Deco Foil Flock Transfer Sheets make it quick and easy! Thanks as always for stopping by today and happy creating,
Deb xo