No Products in the Cart
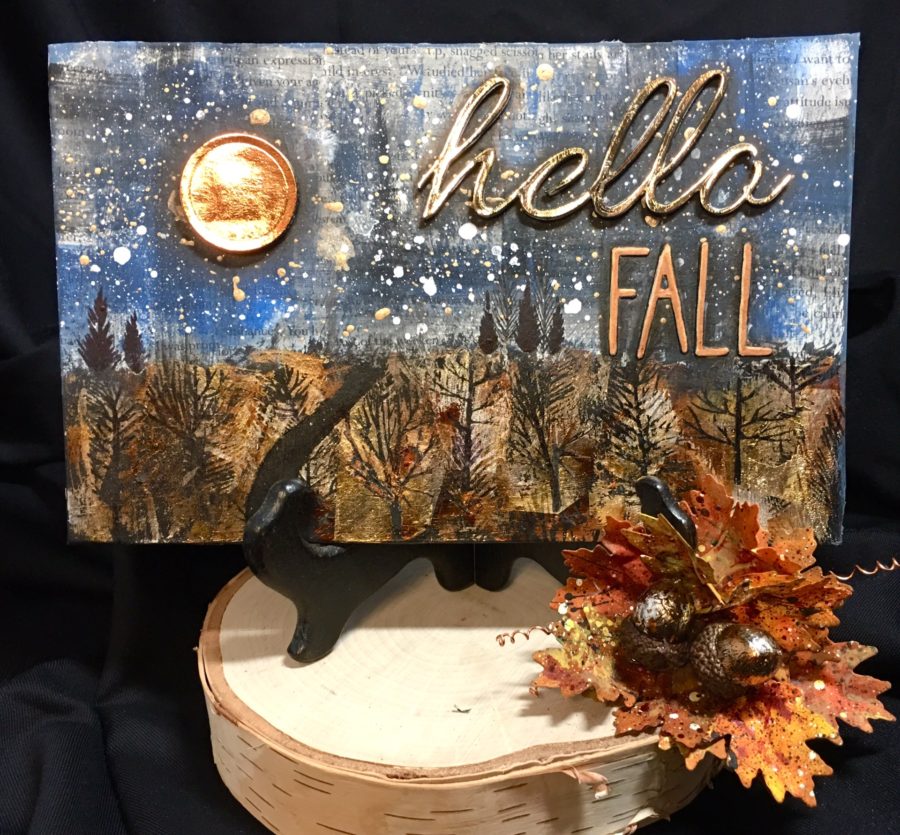
 Mixed Media Deco Foil Fall Home Decor Panel
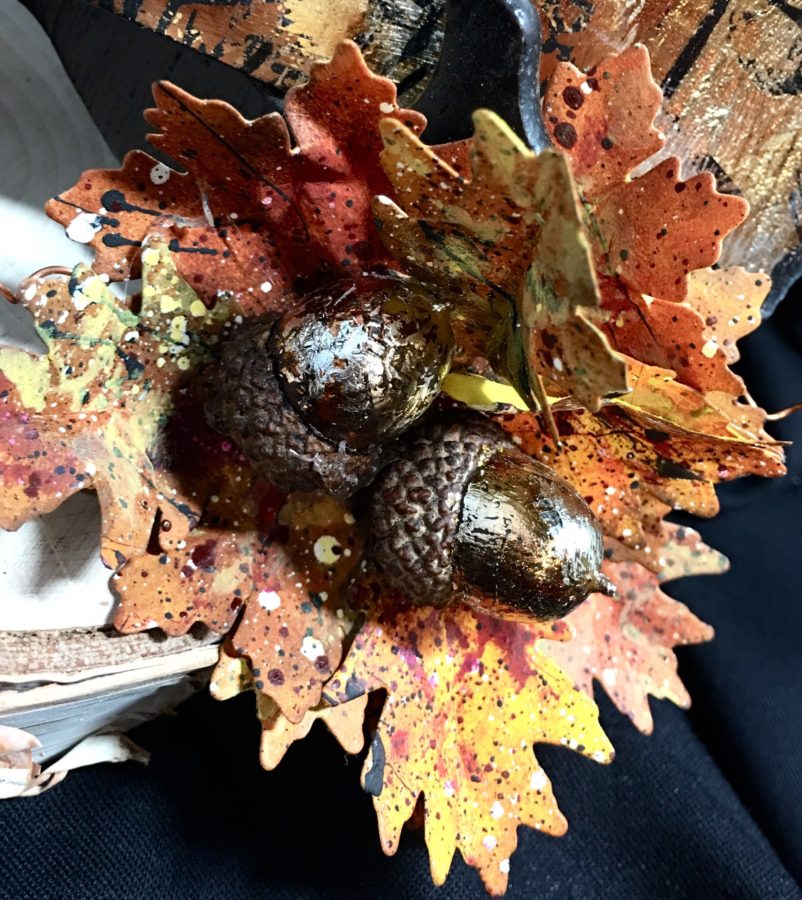
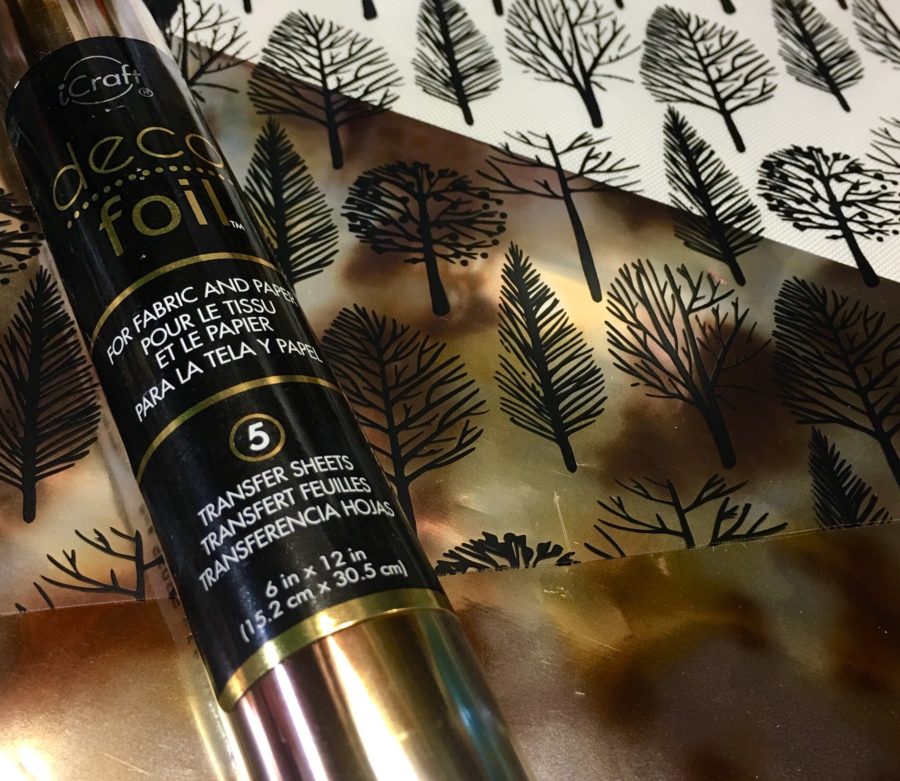
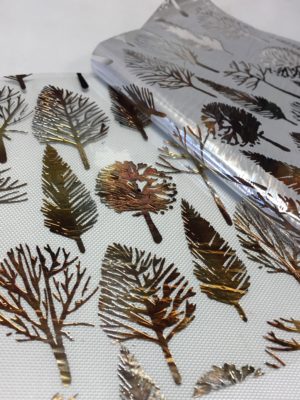
 Time Out: This is the part of our program where I have to show you the technique I stumbled upon. I foiled the new iCraft Deco foil Clear Toner Sheet – Wilderness using Amber Watercolor iCraft Deco foil Transfer Sheets. The result was breathtaking; however, it was when I saw the leftover piece of foil sitting on my black mat that I realized how beautiful the negative space would be on a project . . . and my whole direction changed. I tried a sample on a stray piece of matboard (see picture below).
 Step Two:
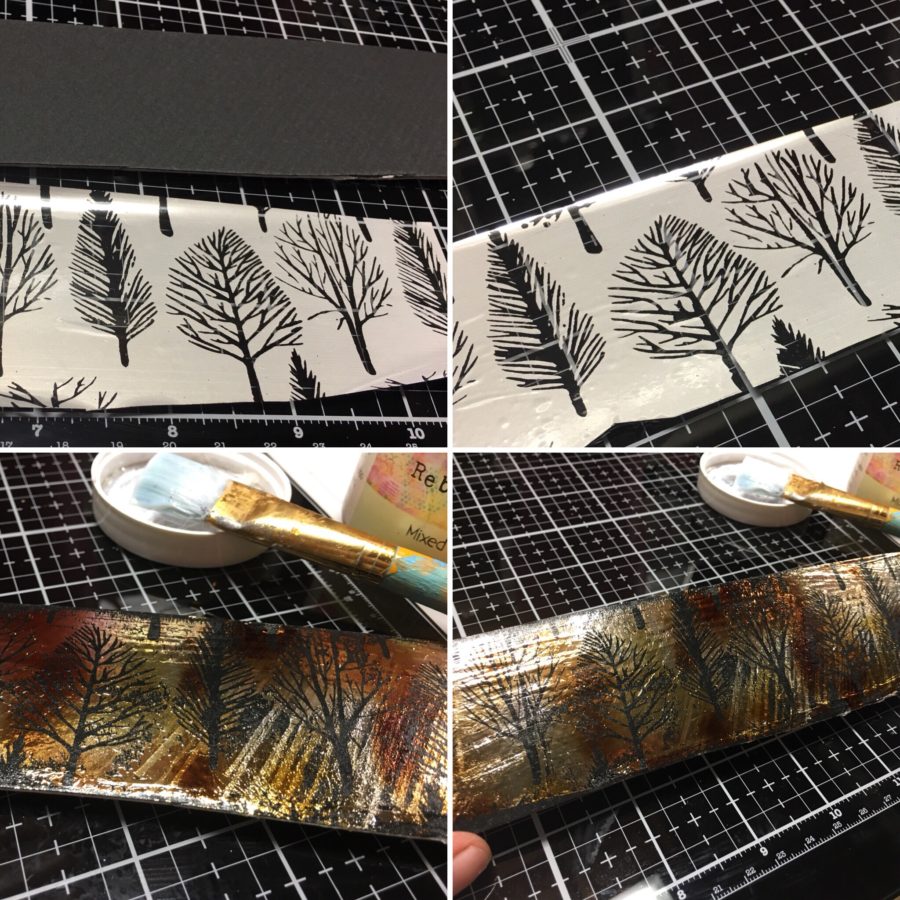
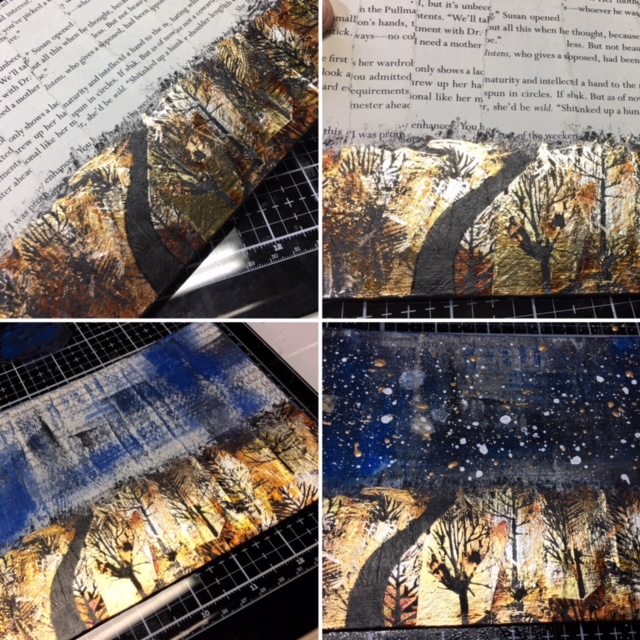
Paint the bottom one-third of the mat board black and cover the black area with a layer of Mixed Media Medium (full strength). Dry with a heat tool or allow to dry until it is clear (no milky white residue but still tacky). While the Medium is drying, foil the iCraft Deco foil Clear Toner Sheet – Wilderness using an Amber Watercolor iCraft Deco foil Transfer Sheet. Set the foiled Clear Toner Sheet aside to use on another project (I intend to create a fall shaker card with mine).
Step Two:
Paint the bottom one-third of the mat board black and cover the black area with a layer of Mixed Media Medium (full strength). Dry with a heat tool or allow to dry until it is clear (no milky white residue but still tacky). While the Medium is drying, foil the iCraft Deco foil Clear Toner Sheet – Wilderness using an Amber Watercolor iCraft Deco foil Transfer Sheet. Set the foiled Clear Toner Sheet aside to use on another project (I intend to create a fall shaker card with mine).
 Add a path to the left half of the black area by cutting a piece of non-stick paper into the shape of a path and laying it atop the black area before moving on to the foiling.
Hint: A potato chip bag or Purple Tape fussy cut into the shape of a path is the perfect non-stick paper to use.
Step Three:
Cut a strip of the trees from the left-over foil and press it onto the Mixed Media Medium and burnish with your finger or burnishing tool. Carefully pull back the release paper from the foil to reveal the forest on the bottom of your panel! Use other pieces from your left-over foil (cut apart individual trees) to fill in the trees where needed until you have a thick nighttime forest.
Hint: Burnishing properly before trying to lift the release paper will save you a lot of frustration. If you do not burnish the foil properly it may either tear your background paper up or release without leaving the foil behind.
Step Four:
Dry brush paint areas of blue and black paint onto the upper two-thirds of the panel, leaving some areas where you can see the book pages through the painted area. Cover the foiled area with a piece of scrap or copy paper and splatter white and gold paint onto the sky area.
Hint: The smaller brush you use for your splatters, the smaller the splatter dots will be.
Add a path to the left half of the black area by cutting a piece of non-stick paper into the shape of a path and laying it atop the black area before moving on to the foiling.
Hint: A potato chip bag or Purple Tape fussy cut into the shape of a path is the perfect non-stick paper to use.
Step Three:
Cut a strip of the trees from the left-over foil and press it onto the Mixed Media Medium and burnish with your finger or burnishing tool. Carefully pull back the release paper from the foil to reveal the forest on the bottom of your panel! Use other pieces from your left-over foil (cut apart individual trees) to fill in the trees where needed until you have a thick nighttime forest.
Hint: Burnishing properly before trying to lift the release paper will save you a lot of frustration. If you do not burnish the foil properly it may either tear your background paper up or release without leaving the foil behind.
Step Four:
Dry brush paint areas of blue and black paint onto the upper two-thirds of the panel, leaving some areas where you can see the book pages through the painted area. Cover the foiled area with a piece of scrap or copy paper and splatter white and gold paint onto the sky area.
Hint: The smaller brush you use for your splatters, the smaller the splatter dots will be.
 Step Five:
Using a black felt pen or marker draw in some additional trees at the horizon line.
Hint: You can also use the marker to go over the negative space and create more definition to your trees.
Step Six:
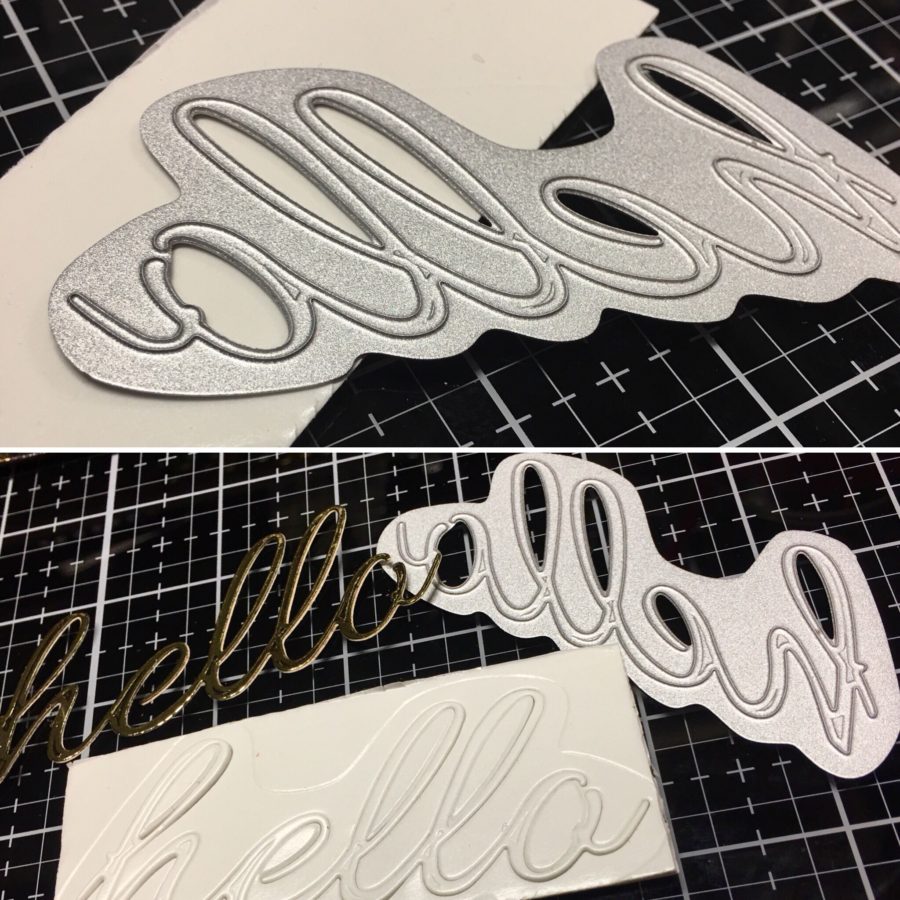
Die-cut and foil a circle to use as a moon and adhere it to the upper, left corner of your panel using dimensional adhesive. Die-cut a sentiment from Peel and Stick Toner Sheets, foil and adhere it to the upper right corner of the panel as pictured below.
Hint: Die-cutting your sentiments from craft foam as well as from cardstock and layering the two easily gives much greater dimension to your sentiment.
Step Five:
Using a black felt pen or marker draw in some additional trees at the horizon line.
Hint: You can also use the marker to go over the negative space and create more definition to your trees.
Step Six:
Die-cut and foil a circle to use as a moon and adhere it to the upper, left corner of your panel using dimensional adhesive. Die-cut a sentiment from Peel and Stick Toner Sheets, foil and adhere it to the upper right corner of the panel as pictured below.
Hint: Die-cutting your sentiments from craft foam as well as from cardstock and layering the two easily gives much greater dimension to your sentiment.
 Step Seven:
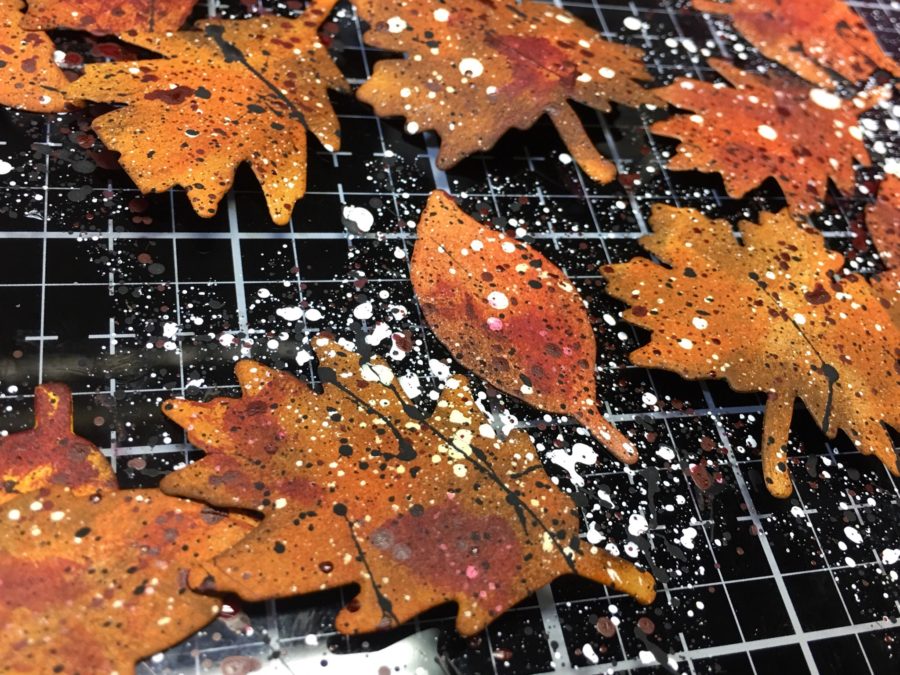
Die-cut from yellow and orange cardstock several leaves using the Gina K. Designs StampnFoil Craft Dies – Thankful Leaves and color using Distress Inks. Crinkle and bend your leaves to give them dimension. Adhere the leaves together (ends in the center) to create a bit of a nest for your acorns.
Hint: Splatter a bit of paint to the finished leaves to add a bit of interest to the color.
Step Seven:
Die-cut from yellow and orange cardstock several leaves using the Gina K. Designs StampnFoil Craft Dies – Thankful Leaves and color using Distress Inks. Crinkle and bend your leaves to give them dimension. Adhere the leaves together (ends in the center) to create a bit of a nest for your acorns.
Hint: Splatter a bit of paint to the finished leaves to add a bit of interest to the color.
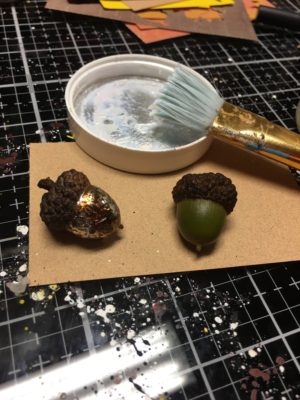
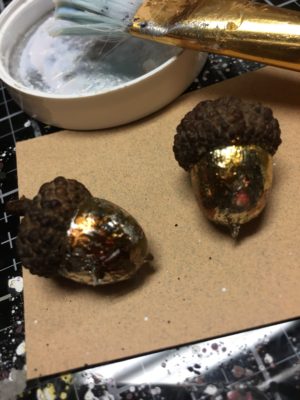
 Step Eight:
Using purchased or gathered acorns, covered desired portions with Mixed Media Medium and foil using Gina K. Designs Fancy Foils. Adhere the acorns to the center of the “nest” using hot glue.
Hint: Accent the nest of leaves by adding bits of twisted copper wire.
Step Eight:
Using purchased or gathered acorns, covered desired portions with Mixed Media Medium and foil using Gina K. Designs Fancy Foils. Adhere the acorns to the center of the “nest” using hot glue.
Hint: Accent the nest of leaves by adding bits of twisted copper wire.
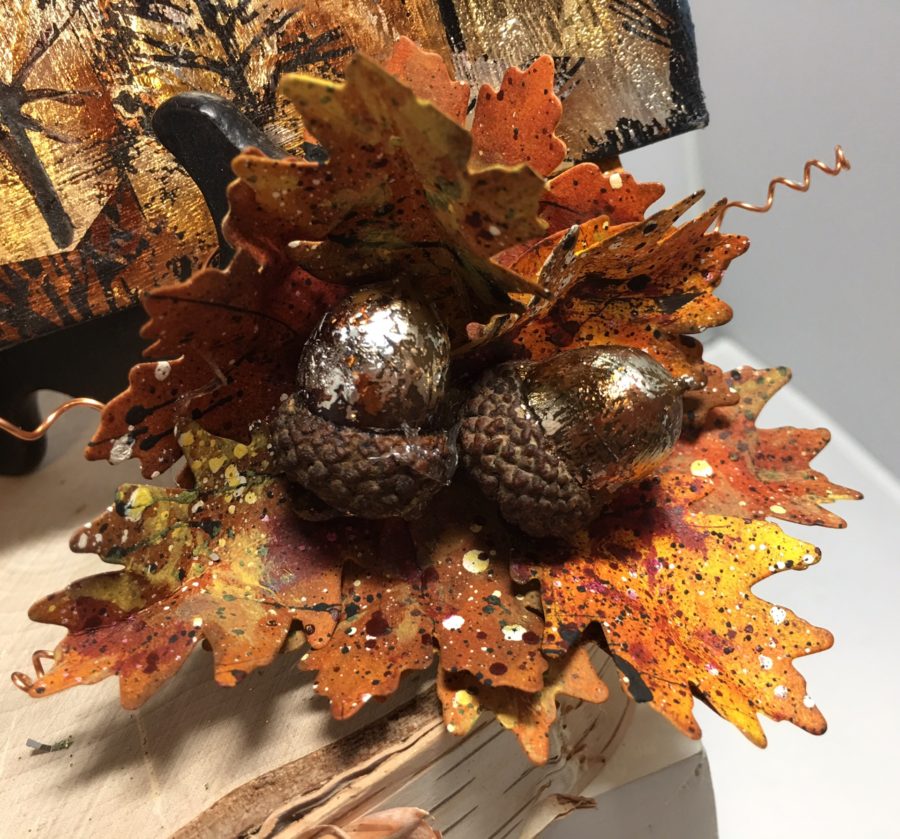 Add your finished panel to a photo holder and place your nest of leaves to the bottom as an accent.