No Products in the Cart
 Hi, Everyone! My name is Jessica Dayon and I'm excited to share my first tutorial with you as a Therm O Web Educator! In case you haven't heard about me before, let me tell you a little bit about myself. I am a stay at home wife & mom with my 4 young children. My children and I love creating things together- from cooking to play dough to paints and clay. We spend our days making things. When I have free time, I love to do just about any craft out there, most specifically, cross stitch, embroidery, crochet, and hand sewing. But when I started quilting, I really found my passion.
I started quilting in the summer of 2017 and have quilted every day since then. You can find my blog HERE. On it, I share free quilt patterns and tutorials so go check it out! You can also find me on Instagram @jessicadayon where you can connect with me and see my daily work, current projects, inspiration, giveaways, quilt alongs, and all of my patterns.
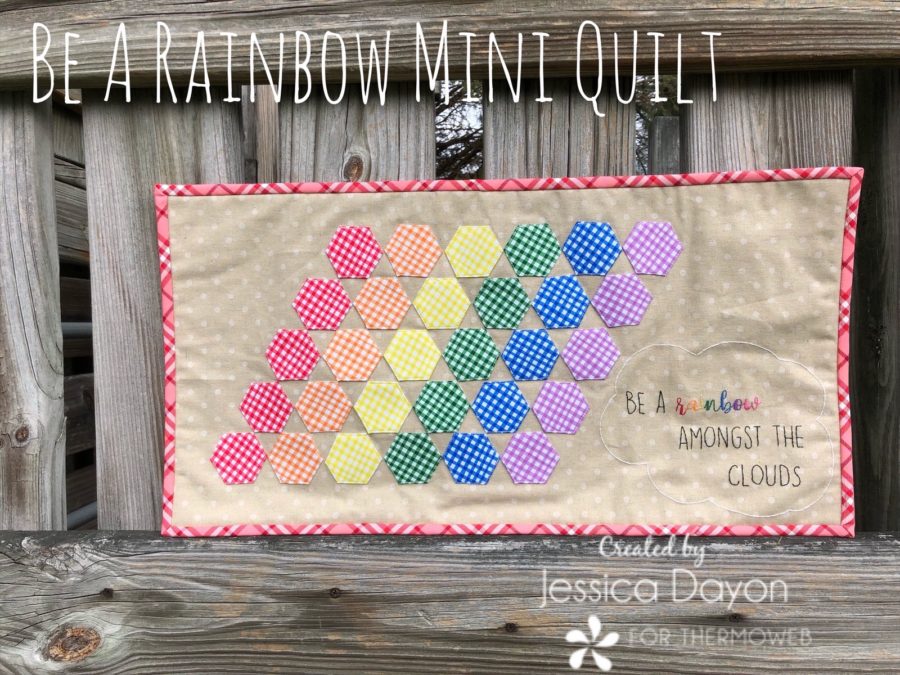
Let's continue onto our tutorial for today! Today we will be making a mini quilt that I call "Be a Rainbow" Mini. This mini quilt has lots of fun and different techniques and I had a really great time designing it and making it. I hope you will have fun making it too!
Hi, Everyone! My name is Jessica Dayon and I'm excited to share my first tutorial with you as a Therm O Web Educator! In case you haven't heard about me before, let me tell you a little bit about myself. I am a stay at home wife & mom with my 4 young children. My children and I love creating things together- from cooking to play dough to paints and clay. We spend our days making things. When I have free time, I love to do just about any craft out there, most specifically, cross stitch, embroidery, crochet, and hand sewing. But when I started quilting, I really found my passion.
I started quilting in the summer of 2017 and have quilted every day since then. You can find my blog HERE. On it, I share free quilt patterns and tutorials so go check it out! You can also find me on Instagram @jessicadayon where you can connect with me and see my daily work, current projects, inspiration, giveaways, quilt alongs, and all of my patterns.
Let's continue onto our tutorial for today! Today we will be making a mini quilt that I call "Be a Rainbow" Mini. This mini quilt has lots of fun and different techniques and I had a really great time designing it and making it. I hope you will have fun making it too!
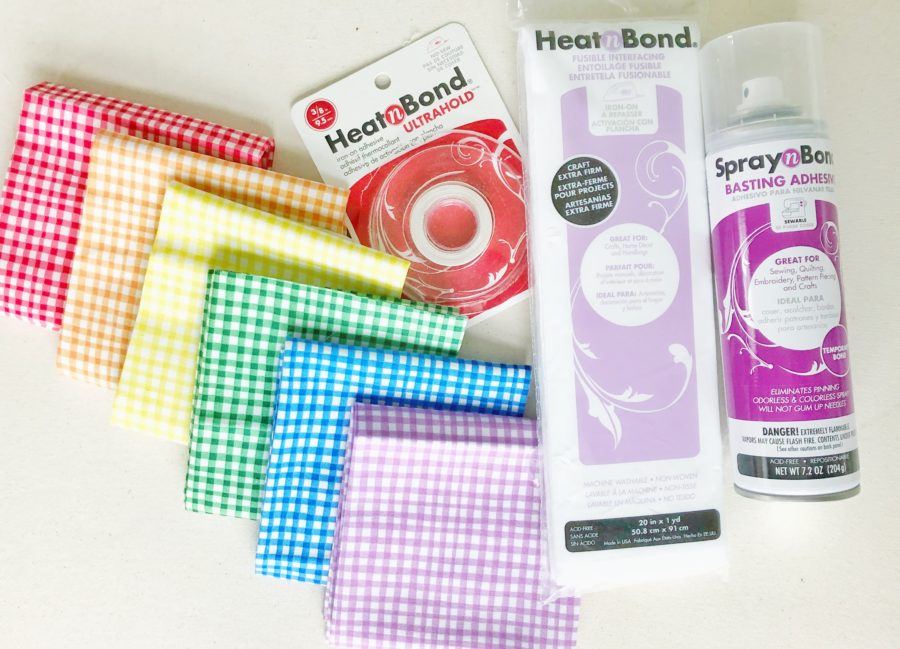 Spray n Bond Basting Adhesive
Heat n Bond UltraHold 3/8" Hem Tape
Heat n Bond Fusible Interfacing Heavy Weight
6 fat eighths of Michael Miller Gingham Play in rainbow color- used here: CX7161-CHER-D, CX7161-PUMP-D, CX7161-LEMO-D, CX7161-LEAF-D, CX7161-COBA-D, and CX7161-LAVE-D
1/2 yard Linen Mochi Dot by Moda Fabrics in Unbleached Linen (SKU 32911 11)
9 skeins of Embroidery Floss in 6 rainbow colors plus 1 pink, 1 black, and 1 white- used here: DMC 321, 971, 743, 909, 826, 552, 603, BLANC, 310
1/4 yard of binding fabric- used here: All Weather Friend by April Rosenthal SKU 24062-11
1/2 yard backing fabric- used here: Sunnyside Up by Corey Yoder SKU 29053-11
14" x 26" piece of cotton batting- used here: The Warm Company Warm & Natural cotton batting
Be A Rainbow Project Template (HERE- template using satin stitch for 'cloud' and HERE- template using backstitch for 'cloud')
OPTIONAL: 4" to 6" embroidery hoop to use while embroidering, not necessary but I did use one when creating this piece
Spray n Bond Basting Adhesive
Heat n Bond UltraHold 3/8" Hem Tape
Heat n Bond Fusible Interfacing Heavy Weight
6 fat eighths of Michael Miller Gingham Play in rainbow color- used here: CX7161-CHER-D, CX7161-PUMP-D, CX7161-LEMO-D, CX7161-LEAF-D, CX7161-COBA-D, and CX7161-LAVE-D
1/2 yard Linen Mochi Dot by Moda Fabrics in Unbleached Linen (SKU 32911 11)
9 skeins of Embroidery Floss in 6 rainbow colors plus 1 pink, 1 black, and 1 white- used here: DMC 321, 971, 743, 909, 826, 552, 603, BLANC, 310
1/4 yard of binding fabric- used here: All Weather Friend by April Rosenthal SKU 24062-11
1/2 yard backing fabric- used here: Sunnyside Up by Corey Yoder SKU 29053-11
14" x 26" piece of cotton batting- used here: The Warm Company Warm & Natural cotton batting
Be A Rainbow Project Template (HERE- template using satin stitch for 'cloud' and HERE- template using backstitch for 'cloud')
OPTIONAL: 4" to 6" embroidery hoop to use while embroidering, not necessary but I did use one when creating this piece
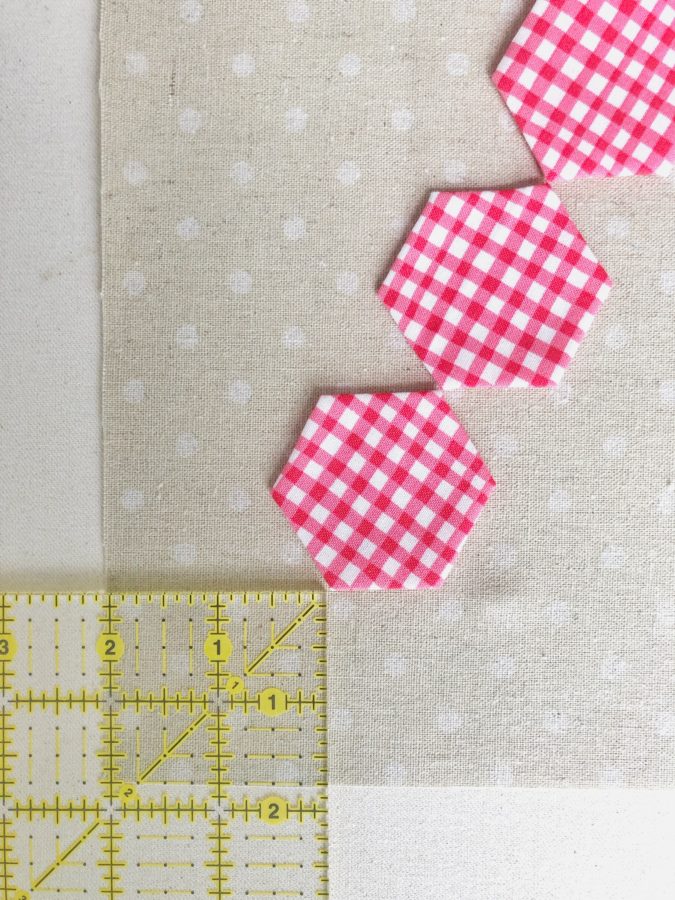
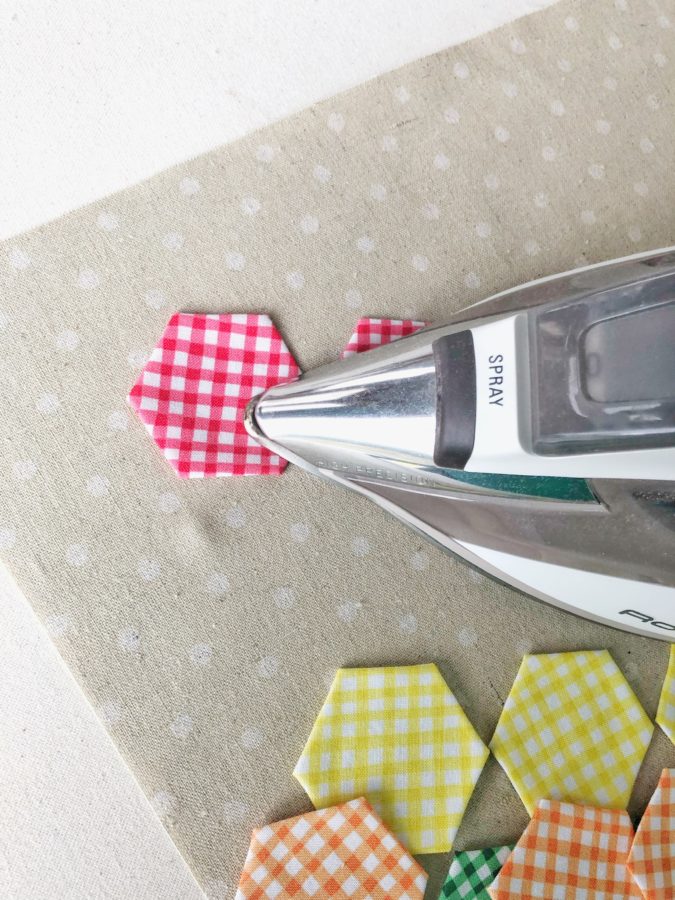
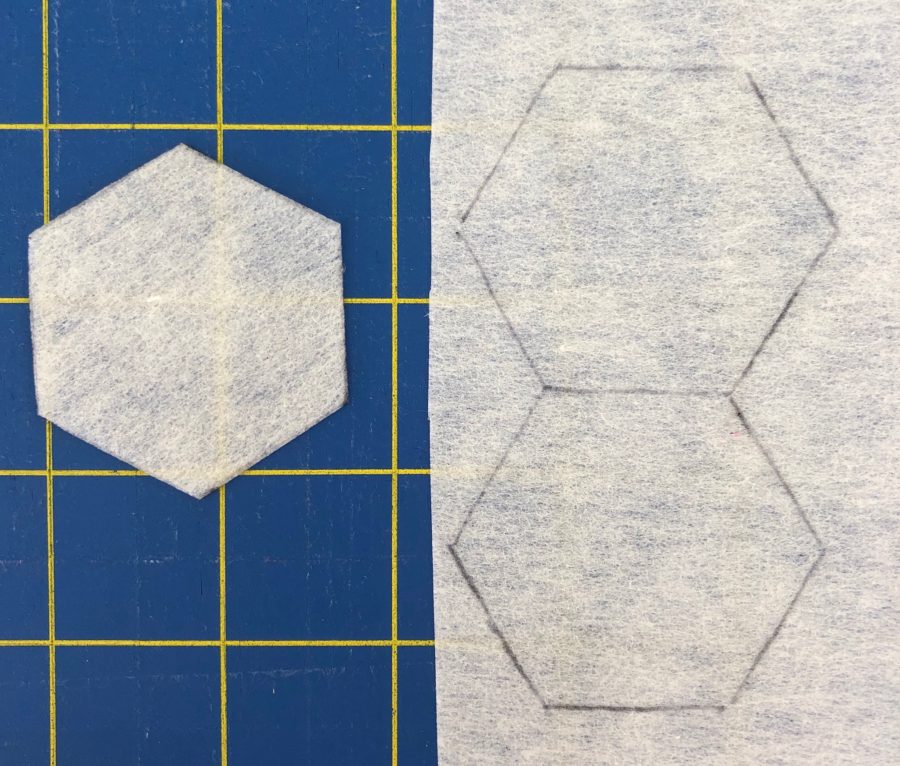 Prepare your hexagon fabric. To do this, I take 5- 3" squares from each of the 6 colors. Then I glued the hexagon to the middle using a glue stick. Make sure that the side of the interfacing that you are gluing to the fabric DOES NOT have the fusible adhesive on it. So, the fusible adhesive should be facing up and the other side should be glued to your fabric.
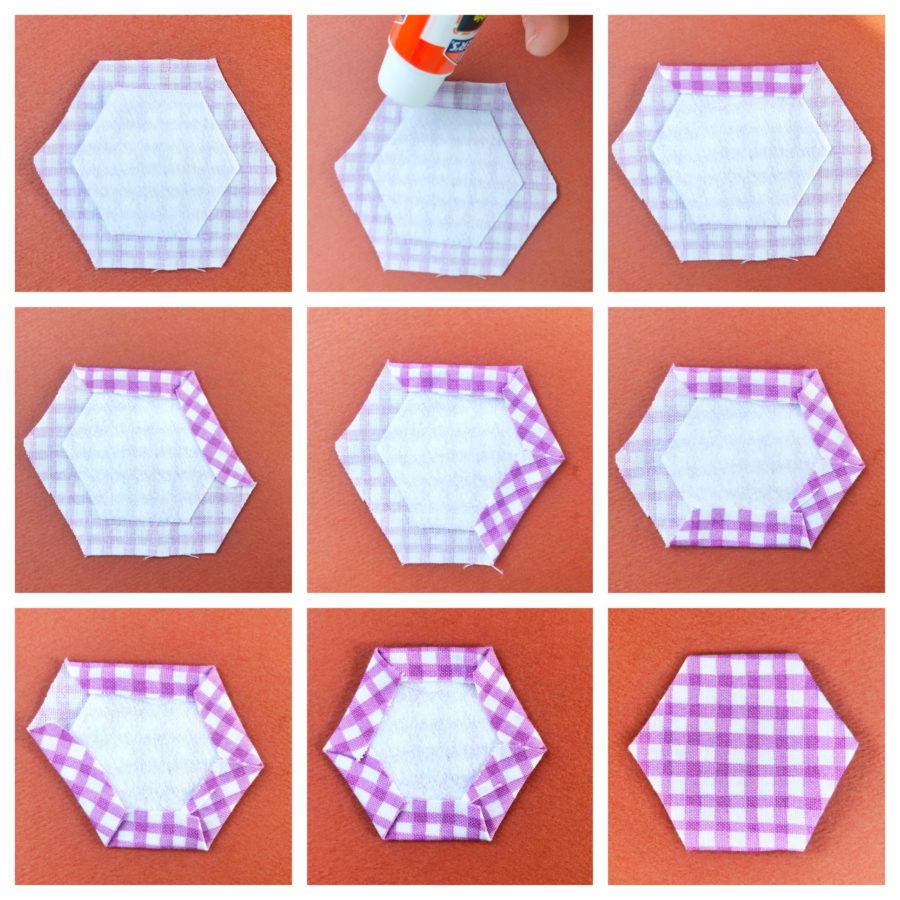
 Next, I trimmed the fabric so that I had roughly 1/4" to 3/8" seam allowance in the shape of a hexagon. Then, glue the seam allowance down onto the hexagon using a glue stick. Glue one side at a time as if you were preparing an EPP shape. I prefer to put my glue onto the fabric and then stick the fabric to the hexagon. However, you could glue the hexagon instead if you prefer to do it that way.
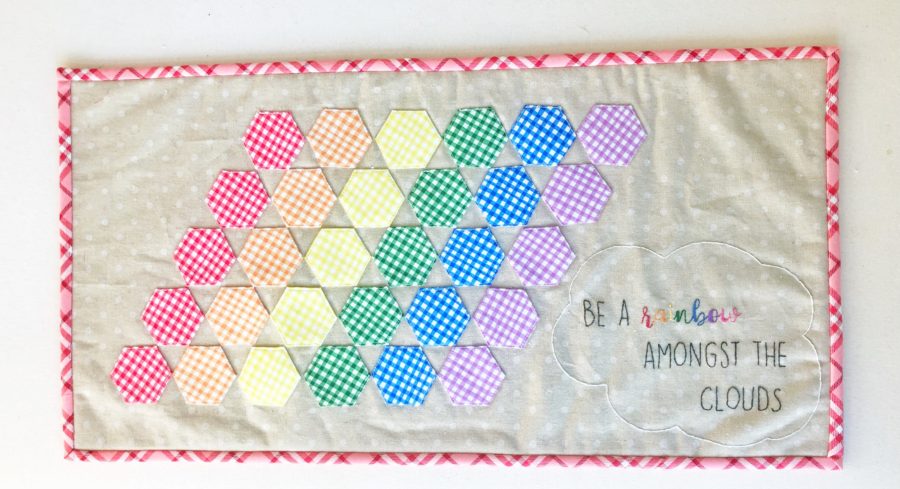
 Repeat these steps for all 30 hexagons.
EMBROIDERY PLACEMENT
Once your hexagons are prepared, position them onto the linen fabric so that you can get an idea of the placement. In this step, you are not securing the hexagons to the fabric. You are only laying them out so that you can determine exactly where your embroidery will go. I started my first red hexagon just about 2" from the bottom corner.
Repeat these steps for all 30 hexagons.
EMBROIDERY PLACEMENT
Once your hexagons are prepared, position them onto the linen fabric so that you can get an idea of the placement. In this step, you are not securing the hexagons to the fabric. You are only laying them out so that you can determine exactly where your embroidery will go. I started my first red hexagon just about 2" from the bottom corner.
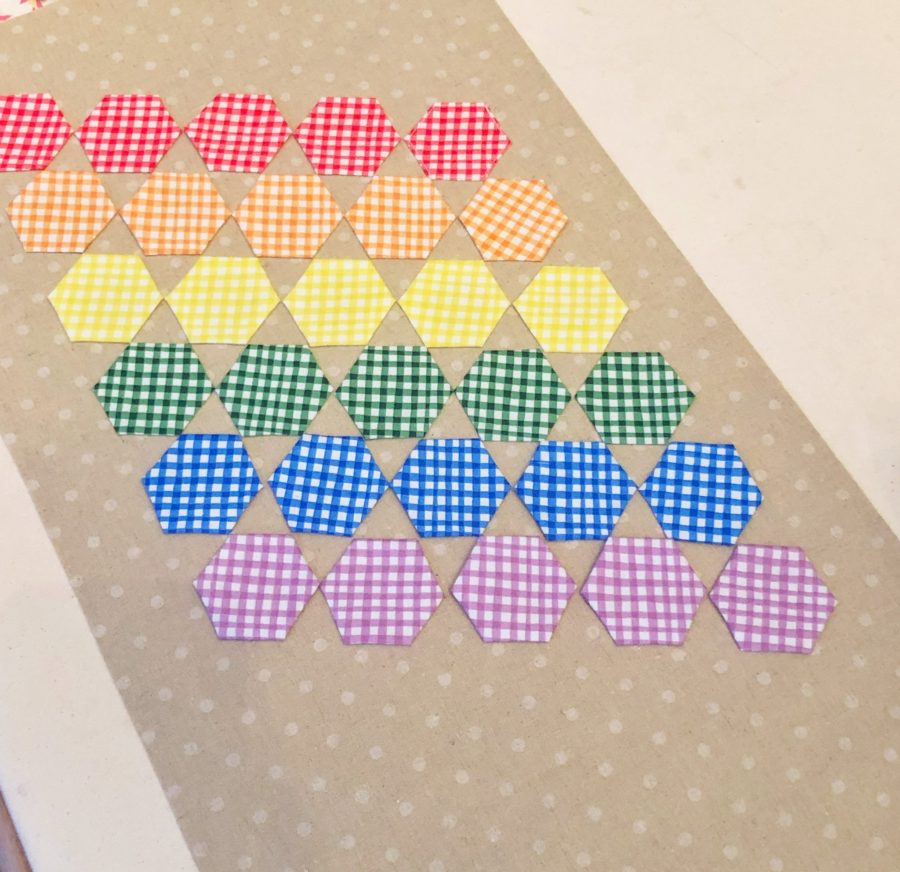
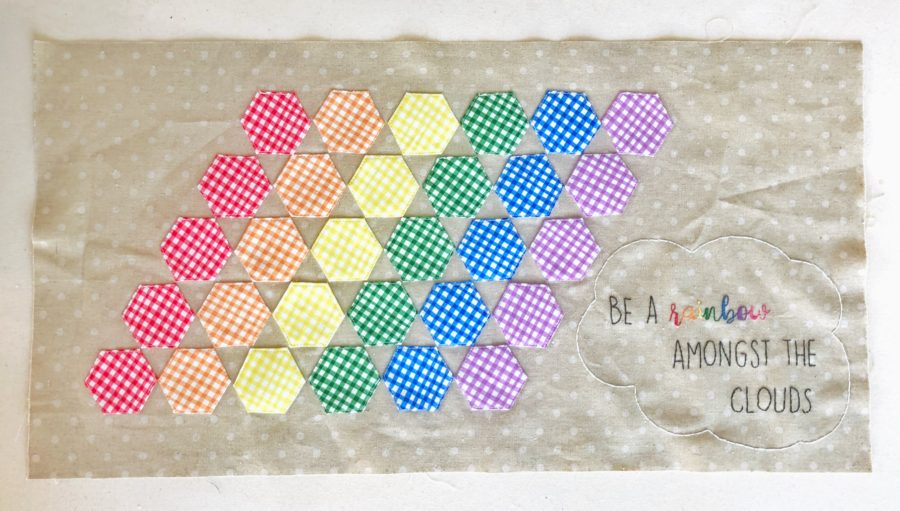
 Then continue to arrange the hexagons as shown in the picture below.
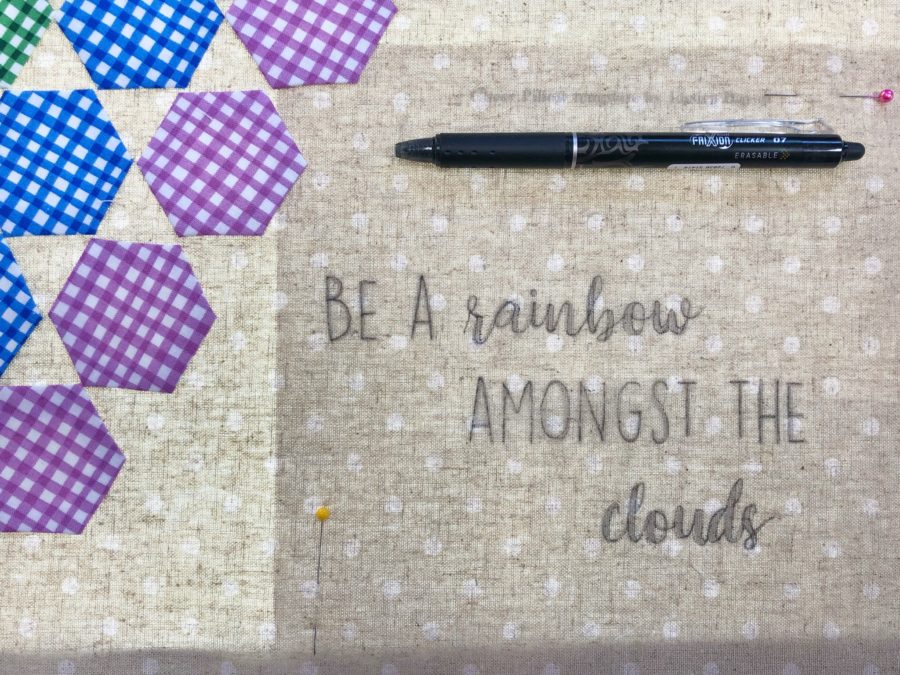
 Once you have the hexagons laid out, slip the embroidery template under the right side of the fabric and choose the exact placement. Pin the paper to the linen so that it is secure. You can remove the hexagons now for the embroidery portion of the project. To transfer my embroidery template to my linen, I used a LightBox and a Frixion pen. (You could also hold it up to a window if you do not have a Light Box.)
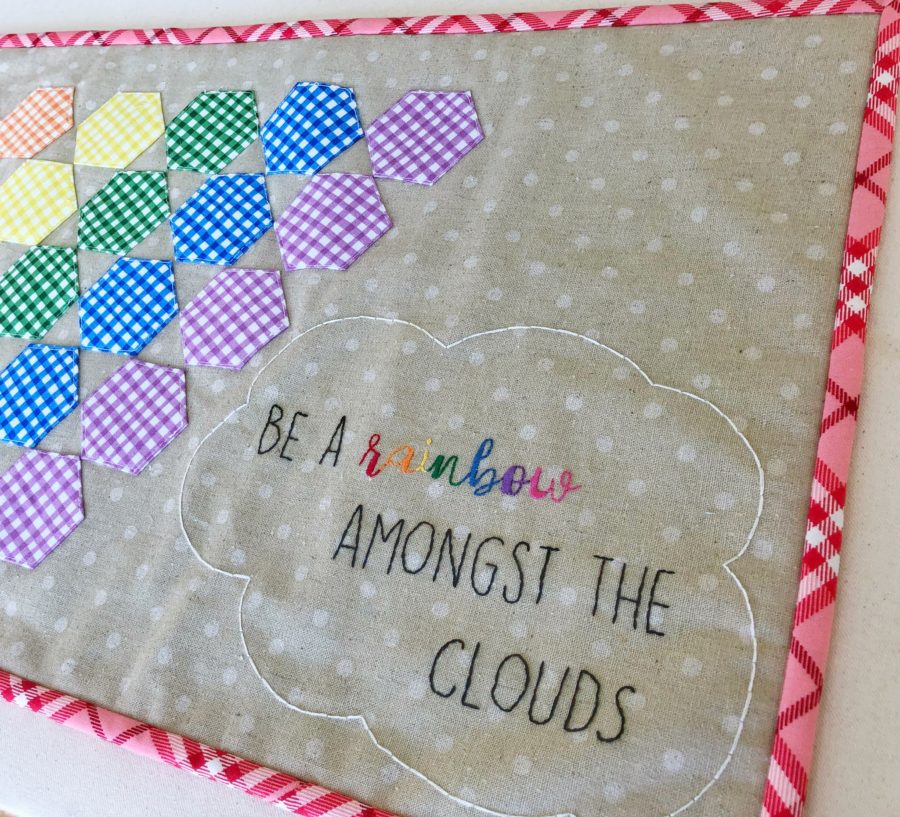
 EMBROIDERING THE SAYING
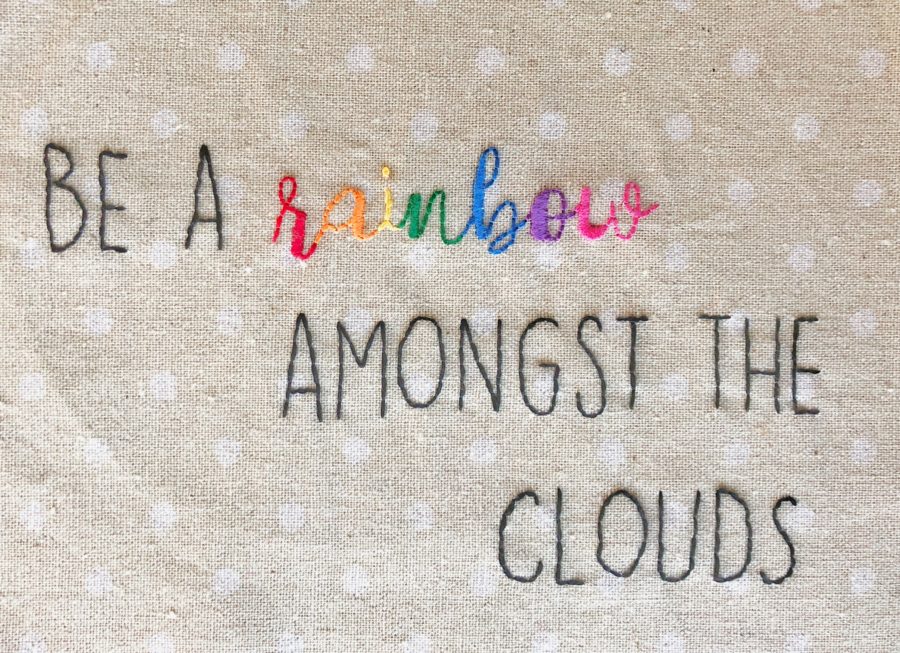
Once you have transferred the saying, use the DMC floss to embroider it. I used double strands of floss throughout. For the black lettering, I used a backstitch. For the rainbow lettering, I used a combination of backstitch and satin stitch.
The best part of the Frixion pen is that you do not have to follow exactly on the line if you do not want to because the heat of your iron will take the ink lines away after you have finished your embroidery. I changed my mind on a few of the letters as I was going but that's no problem when you use the Frixion pen because the ink lines are easily removed. (For the word 'clouds' in the above picture, I planned to use the satin stitch. However, as I was continuing through the project, I decided I wanted it to be in backstitch. So, I changed it. I'm giving you both options in the template so that you can choose which you like better.)
EMBROIDERING THE SAYING
Once you have transferred the saying, use the DMC floss to embroider it. I used double strands of floss throughout. For the black lettering, I used a backstitch. For the rainbow lettering, I used a combination of backstitch and satin stitch.
The best part of the Frixion pen is that you do not have to follow exactly on the line if you do not want to because the heat of your iron will take the ink lines away after you have finished your embroidery. I changed my mind on a few of the letters as I was going but that's no problem when you use the Frixion pen because the ink lines are easily removed. (For the word 'clouds' in the above picture, I planned to use the satin stitch. However, as I was continuing through the project, I decided I wanted it to be in backstitch. So, I changed it. I'm giving you both options in the template so that you can choose which you like better.)
 After the saying is embroidered, I traced the cloud around it using the Light Box and Frixion pen. I did not embroider the cloud right away. I did that after I put the batting and backing together and although I used embroidery floss, I treated it like quilting. The hexagons are sewn down through the quilt sandwich to hold it in place but since there are hexagons on the right side of the mini quilt, I chose to quilt the cloud so it would hold the right side of the project together nicely. You can do what I did or treat it like regular embroidery.
 FUSING THE HEXAGONS
Lay out all of your hexagons in their correct positions. This time we will fuse them to the linen. So once they are in the correct spots, begin fusing them with your iron. Follow the instructions on the Heat n Bond Fusible Interfacing. Note, while the fusible adhesive does a really great job of holding them in place until you sew them down, the edges of each hexagon are not secured down yet because of how we basted over them with the fabric of the hexagon so just be mindful of this.
FUSING THE HEXAGONS
Lay out all of your hexagons in their correct positions. This time we will fuse them to the linen. So once they are in the correct spots, begin fusing them with your iron. Follow the instructions on the Heat n Bond Fusible Interfacing. Note, while the fusible adhesive does a really great job of holding them in place until you sew them down, the edges of each hexagon are not secured down yet because of how we basted over them with the fabric of the hexagon so just be mindful of this.
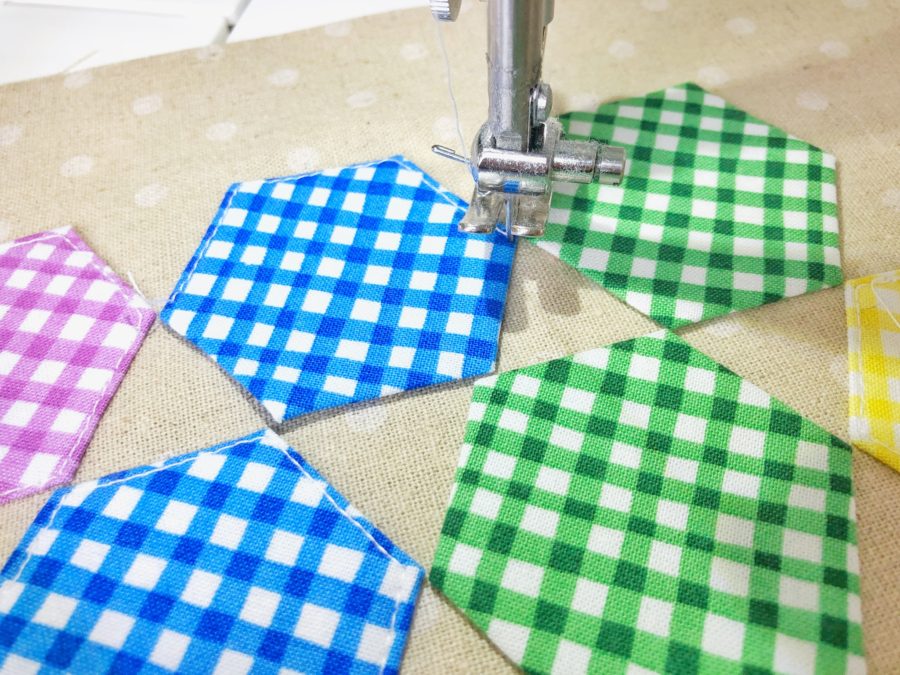
 QUILTING THE HEXAGONS & CLOUD
After all of the hexagons are fused, make the quilt sandwich. Use the Spray n Bond Basting Adhesive to spray baste your top, batting, and backing. Then begin to quilt each hexagon. Backstitch a few stitches at the beginning and at the end of each hexagon. Repeat until all of the hexagons are secured.
QUILTING THE HEXAGONS & CLOUD
After all of the hexagons are fused, make the quilt sandwich. Use the Spray n Bond Basting Adhesive to spray baste your top, batting, and backing. Then begin to quilt each hexagon. Backstitch a few stitches at the beginning and at the end of each hexagon. Repeat until all of the hexagons are secured.
 Using the white embroidery floss, quilt the cloud shape (through the 3 layers).
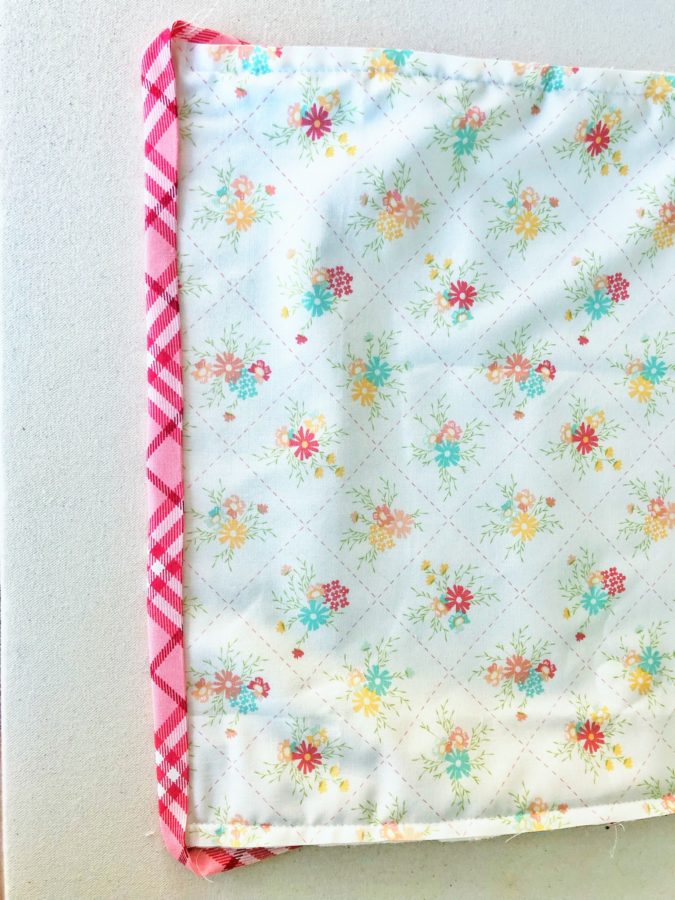
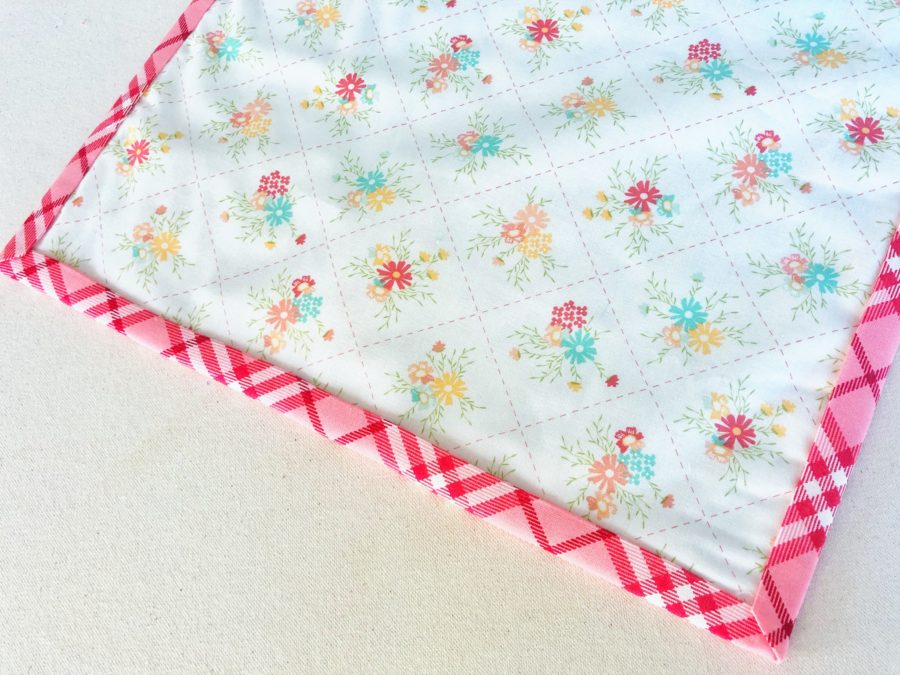
 BINDING
The last step is to bind your mini quilt. Take your prepared binding and stitch it onto the front side of the mini quilt, as you would for any quilt.
BINDING
The last step is to bind your mini quilt. Take your prepared binding and stitch it onto the front side of the mini quilt, as you would for any quilt.
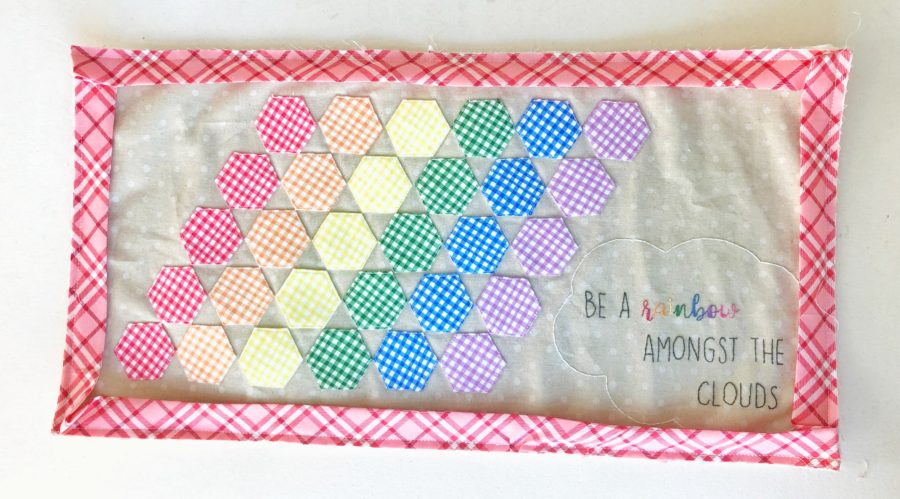 Once the binding has been sewn onto the front, flip the mini quilt over and gently pull your binding so that it can easily wrap around to the back side.
 Secure the binding down with the hem tape. To do this, I work on one side at a time. Get a piece of hem tape that is the length of the side (lay it out to be sure you have the correct size).
 Follow the instructions on the hem tape to secure the binding down.
 Repeat on the three remaining sides. Then you are all finished!
 Enjoy your beautiful mini quilt!
 I hope you have enjoyed this tutorial and you found it easy to follow along with me! If you have any questions, please let me know! Don't forget to follow me on Instagram so you can stay up to date with my latest free projects- @jessicadayon. Share what you made! I'd love to see your progress photos and finished mini quilt! Use the hashtags #bearainbowmini #jessicadayonpatterns #thermoweb #heatnbond #spraynbond and tag me so I can see your version @jessicadayon